![[Creative Commons BY-NC-SA 3.0 Unported License]](https://obdurodon.org/images/cc/88x31.png "Creative Commons BY-NC-SA 3.0 Unported License") Last modified:
2026-02-07T17:14:04+0000
Last modified:
2026-02-07T17:14:04+0000
Authors: Eric Gratta and David J. Birnbaum
Maintained by: David J. Birnbaum (djbpitt@gmail.com)
Last modified:
2026-02-07T17:14:04+0000
XProc is an XML processing language that is written in XML syntax. As defined in its
documentation, XProc is more specifically a language for describing operations to
be performed on XML documents
. Writing XProc requires a knowledge of XML,
XSLT (insofar as XSLT transformations are part of the processing pipeline you intend
to describe), and XProc itself.
XProc is one of the younger members of the XML family of languages (it became a W3C recommendation in May 2010), which means that there are relatively few helpful resources online related to it. The purpose of this tutorial is to provide a brief introduction to the principles of XProc as a pipeline, as well as a description of how it can be used to run chains of XSL transformations. For more information, see:
A computational pipeline is a processing model that decomposes a large task into smaller ones that are connected, so that the output of one process becomes the input to the next. In XProc, a processing language designed specifically for managing XML pipelines, the original input and output. as well as the input and output of the intermediate steps, is normally XML. There may be branches in a pipeline, that is, a pipeline step may have multiple sources of input and may produce multiple output results. A common workflow might involve ingesting an XML document, processing XInclude additions, transforming it with XSLT (perhaps chaining together multiple XSLT transformations), and serializing the result to disk. It is also possible to include schema validation in a pipeline. Chained XSLT transformations could alternatively be managed by writing the intermediate structures to disk or using command-line piping, but those typically entail overhead, such as intermediate disk input/output or the cost of launching a separate JVM for each of several XSLT transformations. XProc is designed to work with XML processing in XML terms, and for that reason it may be a more effective tool for managing complex XML development than generic alternatives.
Because an XProc document describes a pipeline, each step of input and output must be defined, and all steps must be connected. If the connections between adjacent steps in the pipeline are not defined in some way, or if what is intended as a pipeline step is not connected to other steps, then the pipe leaks, and the data fails to traverse the pipeline from beginning to end.
The most common program for running XProc is an open-source tool called Calabash, which relies on Java and Saxon.
Happily, Calabash is bundled with <oXygen/>, so although you can download and install it separately and
run it from the command line, you may find it easier to run your XProc scripts from
within <oXygen/>, and that’s what we do in this tutorial. (If you want to save an
XProc script and run it from the command line with Calabash, the conventional
filename extension for XProc files is .xpl
.) To write your first XProc
document, open <oXygen/>, click New
, and select XProc script
from the options. In the figure below, we’ve typed xproc
into the filetype
selection filter box, which eliminates all filetypes other than the one we want:

The XProc skeleton that <oXygen/> creates looks like this:
<?xml version="1.0" encoding="UTF-8"?>
<p:declare-step xmlns:p="http://www.w3.org/ns/xproc"
    xmlns:c="http://www.w3.org/ns/xproc-step" version="1.0">
    <p:input port="source">
        <p:inline>
            <doc>Hello world!</doc>
        </p:inline>
    </p:input>
    <p:output port="result"/>
    <p:identity/>
</p:declare-step>
You’ll notice that the root element that <oXygen/> creates for you is called
<p:declare-step>. This element declares two namespace prefixes,
p: and c:, and all of the element tags you will be
using in this tutorial are prefaced with either p: or c:.
(XProc accepts, as an alternative root element, <p:pipeline>, which
you may see in other tutorials, but we use <p:declare-step> instead
because it requires you to declare input and output explicitly. Being explicit helps
prevent dynamic errors from occurring when the script is eventually completed and
run.) A pipeline has initial input and final output, which are typically declared as
<p:input> and <p:output> children of
<p:declare-step>. Both input and output must specify a
@port attribute (see below); conventionally, the port for the
primary or only input is source
and the port for the primary or only output
is result
.
In addition to pipeline input and output, an XProc document contains one or more
steps. Each step has it own input and output,
which flow through ports with user-specified names. Pipeline ports, then,
explained immediately above, connect external data to the pipeline as a whole, and
the ports associated with pipeline steps connect the steps to one another (and also
connect the first step to the pipline input and the last step to the pipeline
output). When you create a new <oXygen/> XProc document, you get a skeleton,
which includes <p:identity> as the only step in the pipeline. By
default, the only kind of input and output ports that <p:identity>
can have are described as primary, and primary ports are automatically
connected to preceding or following steps (if there are any; otherwise they are
connected automatically to the input and output of the pipeline as a whole). For
example, if we were to introduce another step immediately after the
<p:identity> without defining its input explicitly, it would
take the output of the preceding <p:identity> as its input. This is
called implicit input. Certain types of steps can also have
secondary input or secondary output, about which see
below.
This figure below, copied from the XProc tutorial at http://www.xfront.com/xproc/, illustrates the relationships among pipelines, steps, and ports:
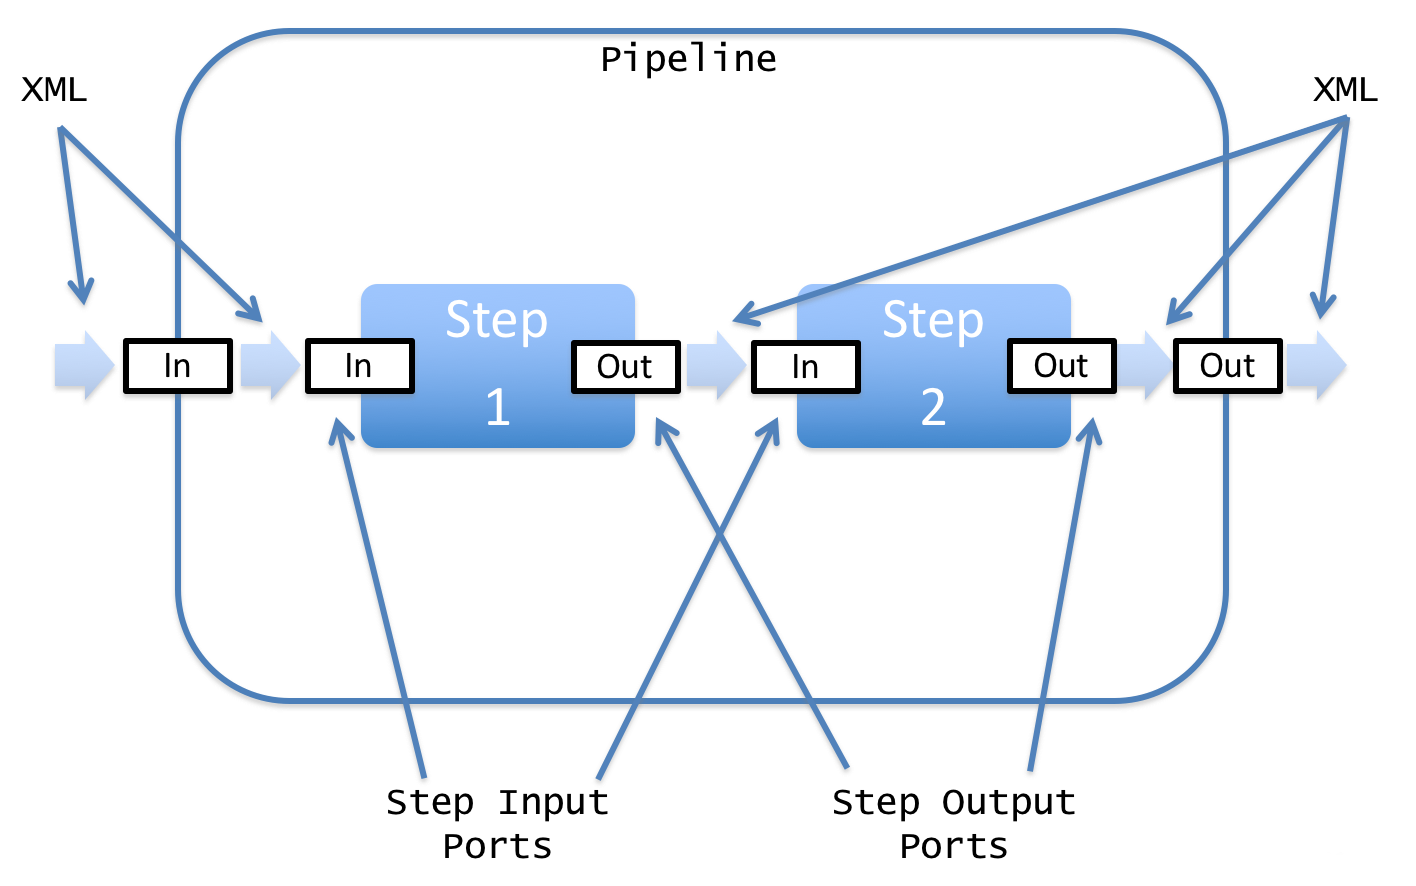
Note that a pipeline (in our example, the <p:declare-step> root
element) has pipeline input and output, represented by the first and last pale blue
right-pointing arrows, which enter and leave the pipeline through ports, represented
by leftmost and rightmost white rectangles labeled In
and Out
. The
pipeline input in this case then enters the first step through the input port of
that step, and is then passed from the output port of one step to the input port of
the next as it moves along the steps. When it exits through the output port of the
last step, it passes into the output port of the pipeline as a whole. Some of these
ports may be implied, but even when they are not expressed explicitly as
<p:input> or <p:output> elements, the pipeline
as a whole plus each pipeline step normally has at least one input and one output
port.
Let’s try running the default <oXygen/> XProc script to see how it
works. Click on Document → Transformation → Apply Transformation Scenario, or
use the toolbar shortcut (a red triangle, pointing to the right, inside a white
circle). As the name suggests, this would normally run a transformation, but
since you haven’t yet created a transformation scenario for your document, it
will instead open the Configure Transformation Scenario window. In that
interface, click New, confirm that you want to create a new XProc transformation
scenario, and change the name from Untitled1
to something like
myFirstXProc
or whatever you will recognize easily. This is the only
field you have to change. (<oXygen/> allows you to predefine input and output
in the transformation scenario instead of in the XProc document itself, but this
contradicts the goal of using XProc to document a project, that is, to document
the workflow that creates project output from project input.) Once you’ve picked
the title you want, hit OK. Then, select the scenario you just created in the
Configure Transformation Scenario window so that it is highlighted in blue, and
click Transform Now. If you haven’t changed anything else, <oXygen/> should
display output that looks like this:
<doc xmlns:c="http://www.w3.org/ns/xproc-step">Hello world!</doc>
In this example, the source input for the pipeline as a whole was defined in
line. That is, we used a <p:inline> element to state
that we were using XML included in line within the XProc file itself (in this
case, the <doc> child element of <p:inline>; the
input must be XML, but it can be any XML, so the root element does not have to
be <doc>) as input data. The <p:identity>
element, in turn, takes implicit input from the preceding step, if there is one,
but since in this case it is the first and only step in the pipeline, it
implicitly takes the pipeline input as input into the step. As a result, the
value of the <p:inline> element (the <doc>
element, with its contents, the string Hello World!
) becomes the input
that flows into <p:identity> through the source
port. The
output of <p:identity> is then automatically (implicitly) piped
into the result
port. declared immediately before it as the output of the
pipeline. Since <p:identity> was the only step, the XProc script
returns what it put through the result port, which was exactly what was input in
the <p:inline>, a <doc> element with the content
Hello World!
. In other words, as its name implies,
<p:identity> describes an identity step, where its output is
identical to its input.
So what happens if we want to use an external document as our pipeline input,
instead of embedding the raw XML inside a <p:inline> element
within the XProc file? To include an external document as input into an XProc
script, we use a <p:document> element, nested inside a
<p:input> element. The <p:input> wrapper
is crucial, though; defining a <p:document> outside a
<p:input> element will not read the document! The purpose of
a <p:input> element is to define the port through which the
input enters the pipeline, which means that <p:document> needs
the port association provided by the <p:input> wrapper to be
useful.
Here is a simple XML document that we can use as input. You can either write your own small file or copy the following XML into a new document:
<?xml version="1.0" encoding="UTF-8"?>
<document>
    <title>My Life Story</title>
    <author>Eric Gratta</author>
    <body>Computational Methods in the Humanities</body>
</document>
Since we want to use this document as input, we can remove the
<p:inline> element and all of its contents from the XProc
skeleton created by <oXygen/>, and replace it with an empty
<p:document> element. <p:document>
requires that we declare an attribute @href, which is the
filesystem path of the document we are loading. For example, if you saved the
XML file above as sampleInput.xml, that serves as the value of your
@href. (If your XML file is not in the same directory as the
XProc script, you need to specify an absolute or relative path to it, and not
just a bare filename.) Here is the modified XProc:
<?xml version="1.0" encoding="UTF-8"?>
<p:declare-step xmlns:p="http://www.w3.org/ns/xproc"
    xmlns:c="http://www.w3.org/ns/xproc-step" version="1.0">
    <p:input port="source">
        <p:document href="sampleInput.xml"/>
    </p:input>
    <p:output port="result"/>
    <p:identity/>
</p:declare-step>
If you run your transformation scenario again, this time it should output the input document unchanged.
The easiest task to accomplish with XSLT within XProc is to transform one XML
document to another. In this example, we transform the XML document books.xml with the XSLT author_list.xsl. The XML document is a short list of four books, and all
the stylesheet transformation does is create a new document with root element
<authors>, sort the authors in alphabetical order by last name,
and output the author of each book as an <author> element. (There
are better ways to use XSLT to create an author list from this sort of data, but our
purpose here is to illustrate the use of XProc, and in that context the choice of
input XML and transformation XSLT is sort of arbitrary.) Here is the books.xml input:
<?xml version="1.0"?>
<!-- From Michael, XSLT 2.0 and XPath 2.0, 4th edition -->
<books>
  <book category="reference">
      <author>Nigel Rees</author>
      <title>Sayings of the Century</title>
      <price>8.95</price>
   </book>
   <book category="fiction">
      <author>Evelyn Waugh</author>
      <title>Sword of Honour</title>
      <price>12.99</price>
   </book>
   <book category="fiction">
      <author>Herman Melville</author>
      <title>Moby Dick</title>
      <price>8.99</price>
   </book>
   <book category="fiction">
      <author>J. R. R. Tolkien</author>
      <title>The Lord of the Rings</title>
      <price>22.99</price>
   </book>
</books>
and here is the author_list.xsl XSLT stylesheet:
<?xml version="1.0" encoding="UTF-8"?>
<xsl:stylesheet xmlns:xsl="http://www.w3.org/1999/XSL/Transform"
    exclude-result-prefixes="#all" version="3.0">
    <xsl:template match="/">
        <authors>
            <xsl:apply-templates select="descendant::book">
                <xsl:sort select="tokenize(author, ' ')[last()]"/>
            </xsl:apply-templates>
        </authors>
    </xsl:template>
    <xsl:template match="book">
        <xsl:copy-of select="author"/>
    </xsl:template>
</xsl:stylesheet>
We create a new XProc script in <oXygen/> and customize it as follows (the
full script is below). Before we begin, though, we need to clarify the meaning
of the term input in an XProc context. In XSLT terms, input is the
XML file that is transformed by the XSLT. In XProc terms, though, any resource
that flows into a pipeline or pipeline step is considered input, and unless it
is implicit, it is defined by a <p:input> element. This means
that the input into the entire pipeline is declared with a
<p:input> child of <p:declare-step>, and the
XML input into the XSLT pipeline step is declared with a
<p:input> child of a <p:xslt> step. But that
isn’t all: the XSLT stylesheet, as well as any parameters you may pass to the
XSLT transformation, are also declared with <p:input> children
of <p:xslt>. Neither the stylesheet nor the parameters would be
considered input in XSLT terms, but in XProc they are, and they have to be
declared with <p:input>.
<p:input> child of the
<p:declare-step> root element entirely or give it a
<p:empty> child; in this case, we arbitrarily choose the
latter. <p:output>;
this will eventually empty into standard output.<p:xslt> to perform an XSLT
transformation. As noted above, in XProc terms, <p:input> is
any resource used in a pipeline step, and not just the XML input to an XSLT
transformation. This means that XProc thinks of the XML input to the
transformation, the stylesheet that performs the transformation, and any
stylesheet parameters as different types of input into the pipeline step.
For this reason, the <p:xslt> element has three
<p:input> children, one for the XML input, one for the
XSLT stylesheet, and one for the XSLT stylesheet parameters. These must have
the specific @port values of source,
stylesheetand
parameters. The stylesheet and parameters ports are required, so if you are not specifying parameters, as is the case here, you should use
<p:empty/> as the content of the <p:input
port="parameters"> element. A <p:xslt> element
must know where its input is coming from, and in this case we specify it by
giving the filename in our source port, but see below for a
<p:xslt> where we do not specify a source port because
the source is determined by other means.<p:xslt> because the output
of the transformation is passed automatically to the result port for the
pipeline as a whole, which we specified earlier with
<p:output>.<p:identity> step that <oXygen/>
supplies at the end of its XProc template, since our
<p:xslt> effectively replaces the default identity
operation as its one pipeline step.The code should end up looking like this:
<p:declare-step xmlns:p="http://www.w3.org/ns/xproc"
xmlns:c="http://www.w3.org/ns/xproc-step" version="1.0">
<p:input port="source">
<p:empty/>
</p:input>
<p:output port="result"/>
<p:xslt name="xml-author_list">
<p:input port="stylesheet">
<p:document href="author_list.xsl"/>
</p:input>
<p:input port="source">
<p:document href="books.xml"/>
</p:input>
<p:input
                            port="parameters">
<p:empty/>
</p:input>
</p:xslt>
</p:declare-step>
When this script is run with the transformation scenario and the documents are in their proper file locations, the output is a chunk of well-formed XML, which is rendered in a window that materializes inside <oXygen/>. So how do we serialize the output to a file, instead of to the window within <oXygen/>?
The answer is the <p:store> element, which can be specified
instead of the default <p:output> we listed originally. The
<p:store> element is the following sibling of the
<p:xslt> element, and has one required @href
attribute, which is the destination and name of the output file, and it
optionally takes similar attributes to <xsl:output>
(@method, @indent, etc.). Here is our XProc
script, modified to save the output to a file:
<p:declare-step xmlns:p="http://www.w3.org/ns/xproc"
    xmlns:c="http://www.w3.org/ns/xproc-step" version="1.0">
    <p:input port="source">
        <p:empty/>
    </p:input>
    <p:xslt name="xml-author_list">
        <p:input port="stylesheet">
            <p:document href="author_list.xsl"/>
        </p:input>
        <p:input port="source">
            <p:document href="books.xml"/>
        </p:input>
        <p:input port="parameters">
            <p:empty/>
        </p:input>
    </p:xslt>
    <p:store href="authors.xml" method="xml" indent="true"/>
</p:declare-step>
Note that we declare either <p:output> or
<p:store>, but not both, so when we add the
<p:store> element, we remove the <p:output>
one. Notice also that <p:store> is a pipeline step, and pipeline
steps follow linear order. But <p:output> identifies an output
port without using it immediately, which means that it can be defined earlyin
the XProc file.
This last example will cover the piping of input from one XSLT transformation into another. We’ve called our second XSLT stylesheet author_html.xsl, and it looks as follows:
<?xml version="1.0" encoding="UTF-8"?>
<xsl:stylesheet xmlns:xsl="http://www.w3.org/1999/XSL/Transform"
    xmlns:xs="http://www.w3.org/2001/XMLSchema"
    xmlns:math="http://www.w3.org/2005/xpath-functions/math" exclude-result-prefixes="#all"
    version="3.0" xmlns="http://www.w3.org/1999/xhtml">
    <xsl:template match="/">
        <html>
            <head>
                <title>Author list</title>
            </head>
            <body>
                <h1>Authors</h1>
                <ul>
                    <xsl:apply-templates select="descendant::author"/>
                </ul>
            </body>
        </html>
    </xsl:template>
    <xsl:template match="author">
        <li>
            <xsl:apply-templates/>
        </li>
    </xsl:template>
</xsl:stylesheet>
Here is how we modify Example 1 (the full XProc script is below):
<p:xslt> immediately after the first one,
with just two <p:input> elements, one with a
@port value of stylesheetand the other with a
@port value of parameters. Because this
<p:xslt> follows the other immediately and pipeline
steps observe linear order, the result of the first transformation becomes
the implicit source XML input to the second, which means that we don’t need
to create a <p:input> for it explicitly. Since we aren’t
using parameters (although we could), we set the content of the paramaters
port of our second <p:xslt> as <p:empty>,
and we set the stylesheet port to point to our second stylesheet with
<p:document href="author_html.xsl"/>.<p:xslt> to
disk by piping it into <p:store>. Since we now want the
output of the first transformation to go into the second, instead of being
written to disk, we remove that <p:store>.<p:store> after the second
<p:xslt>, where its location at the end of the pipeline
means that the output of the second transformation should be written to
disk. Serialization parameters that we would normally specify on
<xsl:output> in a standalone XSLT transformation are
instead specified on <p:store>.The complete XProc script looks like this:
<p:declare-step xmlns:p="http://www.w3.org/ns/xproc" xmlns:c="http://www.w3.org/ns/xproc-step"
    version="1.0">
    <p:xslt>
        <p:input port="stylesheet">
            <p:document href="author_list.xsl"/>
        </p:input>
        <p:input port="source">
            <p:document href="books.xml"/>
        </p:input>
        <p:input port="parameters">
            <p:empty/>
        </p:input>
    </p:xslt>
    <p:xslt>
        <p:input port="stylesheet">
            <p:document href="author_html.xsl"/>
        </p:input>
        <p:input port="parameters">
            <p:empty/>
        </p:input>
    </p:xslt>
    <p:store href="authors.html" method="xml" indent="true" doctype-system="about:legacy-compat"
        omit-xml-declaration="false"/>
</p:declare-step>
The last example above takes advantage of the fact that the primary output of one step flows automatically into the primary input of the next. We can describe this by saying the the primary output and input of consecutive steps are connected implicitly. But we can also specify a connection explicitly. If the flow involves just primary ports of atomic steps (steps without looping or branching), it may be simpler to let the implicit connections do their work. But by way of illustration, the following XProc script uses explicit connections to perform exactly the same operations as Example 2, above. We’ve highlighted the code responsible for the explicit connections, which we discuss below:
<p:declare-step xmlns:p="http://www.w3.org/ns/xproc" xmlns:c="http://www.w3.org/ns/xproc-step"
    version="1.0" name="myPipeline">
    <p:input port="source">
        <p:document href="books.xml"/>
    </p:input>
    <p:output port="result">
        <p:pipe port="result" step="convert-to-html"/>
    </p:output>
    <p:xslt name="extract-authors">
        <p:input port="source">
            <p:pipe step="myPipeline" port="source"/>
        </p:input>
        <p:input port="stylesheet">
            <p:document href="author_list.xsl"/>
        </p:input>
        <p:input port="parameters">
            <p:empty/>
        </p:input>
    </p:xslt>
    <p:xslt name="convert-to-html">
        <p:input port="source">
            <p:pipe step="extract-authors" port="result"/>
        </p:input>
        <p:input port="stylesheet">
            <p:document href="author_html.xsl"/>
        </p:input>
        <p:input port="parameters">
            <p:empty/>
        </p:input>
    </p:xslt>
</p:declare-step>
Here’s how it works:
@name attribute to the pipline as a whole (our
<p:declare-step> element) and to the two steps, the two
<p:xslt> elements. If we think of the pipeline as also a
type of step, every step now has a unique @name, which means that
every input and output port (<p:input> and
<p:output>) can be identified uniquely by a combination of
the @name of its parent element and its own @port
value. For example, the input port into the pipeline as a whole is the
<p:input> child of <p:declare-step>, and can
therefore be referenced through a combination of the @name value of
<p:declare-step> (myPipeline) and the
@port value of the <p:input> element
(source).
<p:pipe> element, which has a @step attribute
that points to the @name of its source and a @port
attribute value that matches the @port value of the resource to
which it wants to connect. For example, <p:pipe step="extract-authors"
port="result"/>, which we’ll examine more closely later, means
find and use the element with a.@portvalue ofresult(which may be implicit) in the step that has the@namevalueextract-authors
<p:input> child of
<p:declare-step> gets its input from the filesystem by using
the <p:document> element. This gets the initial input XML into
the pipeline. We can refer to that step in the pipeline with a
<p:pipe> element that has a @step value that
matches of the @name value of <p:declare-step>
(myPipeline) and a
@port value that matches the
@port value of its <p:input>
(source).
<p:output> child of
<p:declare-step> for now; we’ll come back to it.<p:xslt> step is called extract-authors. Inside it, we use the
<p:pipe> element to declare explicitly that this
first XSLT transformation step gets its sourceinput, the XML that is to be transformed, from a pipe that emerges from the
sourceport of the
myPipelinestep. A
<p:pipe> element can thus be
considered a connection from whatever it points to to its parent. Since the
parent of the <p:pipe> element in this case is the
<p:input type="source"> element of a
<p:xslt> step, it means that the output of the pipe we’ve
just created will flow into the sourceinput port of the
<p:xslt> step. The effect is to declare explicitly that the
sourceinput into the pipeline as a whole should be used as (flow into) the
sourceinput into the first
<p:xslt> step.<p:xslt> step explicitly asks for its
source input from the resultport of the first
<p:xslt>
step. It is—perhaps confusingly at first—an error to declare
<p:output> on a <p:xslt> step (or any atomic
step) because these automatically always produce result output (even though the
output may be null). In other words, the output resultport of the first XSLT transformation in this case is implicit, which means that we can refer to it with a combination of the
@name of the parent step that produces
it (extract-authors) and the
@port value of resulteven thought that port was not declared explicitly inside the first step.
<p:output> child of the
<p:declare-step> element, we see that we’ve used
<p:pipe> to tell it that it should read from the (implicit)
resultport of the second
<p:xslt> element, which we
identify through its @name attribute value (convert-to html).
The combination of simple atomic steps in the preceding example means that it is
probably easier to let the implicit flow of information from the primary output of
one step into the primary input of the next manage the connections. The ability to
use <p:pipe> to refer to any step becomes necessary, though, where
we need to connect non-consecutive steps. That more complex workflow goes beyond the
modest goals of this first tutorial, and we encourage you to learn about these and
other more advanced XProc concepts from Roger Costello’s comprehensive XProc Tutorial, mentioned
above.
The following is an advanced XProc script used in a real project, with comments in line and explanation below:
<?xml version="1.0" encoding="UTF-8"?>
<p:declare-step name="process-adj" xmlns:p="http://www.w3.org/ns/xproc"
    xmlns:cx="http://xmlcalabash.com/ns/extensions" xmlns:c="http://www.w3.org/ns/xproc-step"
    version="1.0" exclude-inline-prefixes="#all">
    <!-- See:
        https://stackoverflow.com/questions/2951343/xslt-workflow-with-variable-number-of-source-files/2951665#2951665
        https://lists.w3.org/Archives/Public/xproc-dev/2011Nov/0012.html
    -->
    <!-- Pretty-print to make it easier to read -->
    <p:serialization port="result" indent="true"/>
    <!-- Dummy source establishes this file as context for base uri -->
    <p:input port="source" sequence="true">
        <p:inline>
            <null/>
        </p:inline>
    </p:input>
    <p:output port="result" primary="true" sequence="true">
        <p:pipe port="result" step="split"/>
    </p:output>
    <!-- Use Calabash extensions for diagnostic messages -->
    <p:import href="http://xmlcalabash.com/extension/steps/library-1.0.xpl"/>
    <!-- Everything should be relative to the adj directory -->
    <p:variable name="base" select="resolve-uri('./', base-uri(/))"/>
    <p:variable name="fin-base" select="resolve-uri('../../finland', base-uri(/))"/>
    <!-- Get list of all finland files -->
    <cx:message name="message_load">
        <p:with-option name="message" select="'Reading full dictionary input'"/>
    </cx:message>
    <p:directory-list>
        <p:with-option name="path" select="$fin-base"/>
    </p:directory-list>
    <!-- Load each file -->
    <p:for-each name="load">
        <p:iteration-source select="//c:file"/>
        <p:load>
            <p:with-option name="href" select="resolve-uri(/c:file/@name, base-uri(/))"/>
        </p:load>
    </p:for-each>
    <!-- wrap to treat as one document -->
    <p:wrap-sequence wrapper="words"/>
    <!-- keep only the adjectives -->
    <cx:message name="message_select">
        <p:with-option name="message" select="'Selecting adjectives'"/>
    </cx:message>
    <p:filter
        select="//item[(starts-with(remainder,'п ') and not(alt-category)) or alt-category[starts-with(.,'п ')]]"> </p:filter>
    <!-- wrap to treat as one document ... again! -->
    <p:wrap-sequence wrapper="words"/>
    <!-- generate forms -->
    <cx:message name="message_generate">
        <p:with-option name="message" select="'Generating adjective forms'"/>
    </cx:message>
    <p:xslt name="generate">
        <p:input port="parameters">
            <p:empty/>
        </p:input>
        <p:input port="stylesheet">
            <p:document href="adj-generate.xsl"/>
        </p:input>
    </p:xslt>
    <!-- consolidate forms -->
    <cx:message name="message_consolidate">
        <p:with-option name="message" select="'Consolidating adjective forms'"/>
    </cx:message>
    <p:xslt name="consolidate">
        <p:input port="parameters">
            <p:empty/>
        </p:input>
        <p:input port="stylesheet">
            <p:document href="../../lib/attributes-to-elements.xsl"/>
        </p:input>
    </p:xslt>
    <!-- split by first letter of string value and write into results subdirectory-->
    <cx:message name="message_split">
        <p:with-option name="message" select="'Splitting results'"/>
    </cx:message>
    <p:xslt name="split">
        <p:input port="parameters">
            <p:empty/>
        </p:input>
        <p:input port="stylesheet">
            <p:document href="adj-split.xsl"/>
        </p:input>
    </p:xslt>
    <!-- save individual result files -->
    <cx:message name="message_store">
        <p:input port="source">
            <p:inline>
                <null/>
            </p:inline>
        </p:input>
        <p:with-option name="message" select="'Storing results'"/>
    </cx:message>
    <p:sink/>
    <p:for-each>
        <p:iteration-source>
            <p:pipe port="secondary" step="split"/>
        </p:iteration-source>
        <p:store>
            <p:with-option name="href"
                select="resolve-uri(concat('./results/',  replace(base-uri(/*),
                '^(.*/)?([^/]+)$', '$2')),$base)"
            />
        </p:store>
    </p:for-each>
</p:declare-step>
Lines 2–4: In addition to the usual p: and
c: namespace prefixes, we declare also cx:,
which we bind to the namespace for Calabash extensions. Calabash is the XProc processor that
we use in this project, and the extensions let us write informational
messages to the screen during the transformation.
<p:serialization> to
pretty-print the final output, wich makes it easier for humans to read.split, lines 78–85.resolve-uri(). We use
resolve-uri() to construct path information needed to find the
main input files ($fin-base) and write the eventual XML output
files (relative to $base; see Lines 100–03).finland directory.<item> elements to keep
only those that are adjectives, which we identify in the predicate.<item> elements in an
arbitrary wrapper so that they’ll form a single XML input into the next
step.adj-generate.xsl XSLT
stylesheet to generate inflected forms of adjectives.attributes-to-elements.xsl
XSLT stylesheet to restructure output of previous transformation.adj-split.xsl XSLT stylesheet
to create separate output for adjectives according to their first letters. The
XSLT uses <xsl:result-document> to create the output files. By
definition, <xsl:result-document> inside XProc writes to the
secondary output port, and there is no primary output.