![Creative Commons BY-NC-SA 3.0 Unported License [Creative Commons BY-NC-SA 3.0 Unported License]](https://obdurodon.org/images/cc/88x31.png) Last modified:
2021-12-27T22:03:55+0000
Last modified:
2021-12-27T22:03:55+0000
Author: Janis Chinn (jec115@pitt.edu)
Maintained by: David J. Birnbaum (djbpitt@gmail.com)
![Creative Commons BY-NC-SA 3.0 Unported License [Creative Commons BY-NC-SA 3.0 Unported License]](https://obdurodon.org/images/cc/88x31.png) Last modified:
2021-12-27T22:03:55+0000
Last modified:
2021-12-27T22:03:55+0000
There are a few ways to transform an XML document with XSLT. The first involves inserting a line into the XML document that tells the browser to use a particular XSLT stylesheet to transform the document before rendering it. This is similar to associating a CSS stylesheet with an XML document. This approach has the convenience of saving you, the developer, from having to remember to run the transformation yourself when you modify your XML. Since under this approach the transformation is being applied automatically in the user’s browser every time the user accesses the document on your server, whenever you update the XML, the user will see the updates. The principal disadvantage of client-side (that is, in-the-browser) XSLT transformation is that no browser currently supports XSLT 2.0, so you would be restricting yourself to XSLT 1.0 features. Another disadvantage is that this approach suggests that you’re going to transform your document in only one way, perhaps to generate an attractive version for reading. If you need to perform different types of transformations for different purposes (for example, perhaps, in addition to the reading view, you want to be able to generate analytical reports with XSLT), associating a single stylesheet with the document might not be the best representation of your architecture. If neither of those concerns is relevant in your case, though, associating the XSLT stylesheet directly with the XML document instance is convenient and robust.
As an alternative, you can perform the transformation yourself and serve not the XML plus
stylesheet, but just the HTML output of the stylesheet transformation. This lets you use
XSLT 2.0 features, but it means that you have to remember to regenerate the HTML
whenever you change the XML. There are ways to automate this reminder
; ask us if
it looks like something you might need to do.
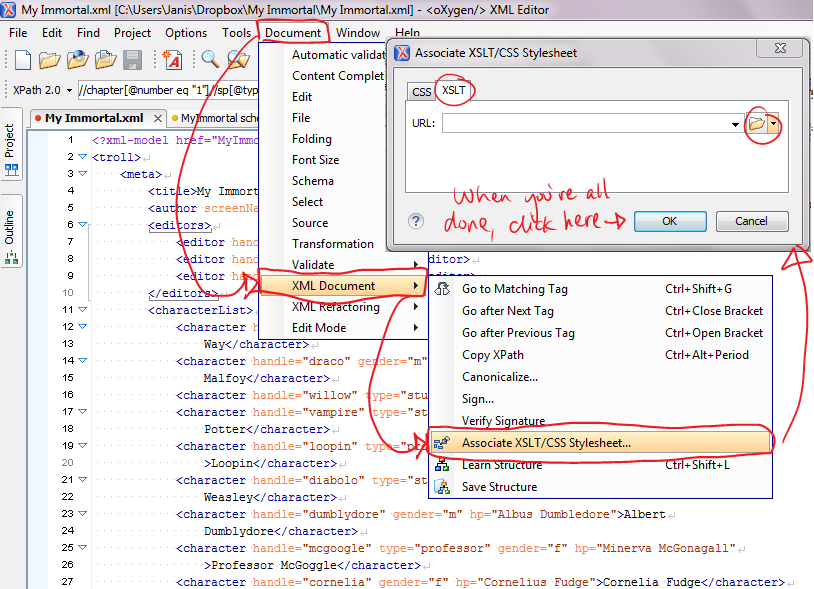
The easiest way to associate your XSLT stylesheet with your XML document instance is to let <oXygen> help you. As is illustrated below, with your XML document open in <oXygen>, go to the Document menu and select XML Document, then Associate XSLT/CSS Stylesheet. Change to the XSLT tab, click on the little folder icon to the right of the text input box, and pick your XSLT file. When you next load the XML file into a web browser, you should see your XML styled according to your XSLT.

If you would rather keep your user from having to apply the transformation in the browser (a necessity if you’re using XSLT 2.0 features), you can instead do the transformation on your end and upload an HTML document directly. This is a little more complicated for you (it involves more clicking), but not terribly so, and it also means you don’t have to upload your XML and your XSL files if you don’t want to. Once again, you can let <oXygen/> help you.
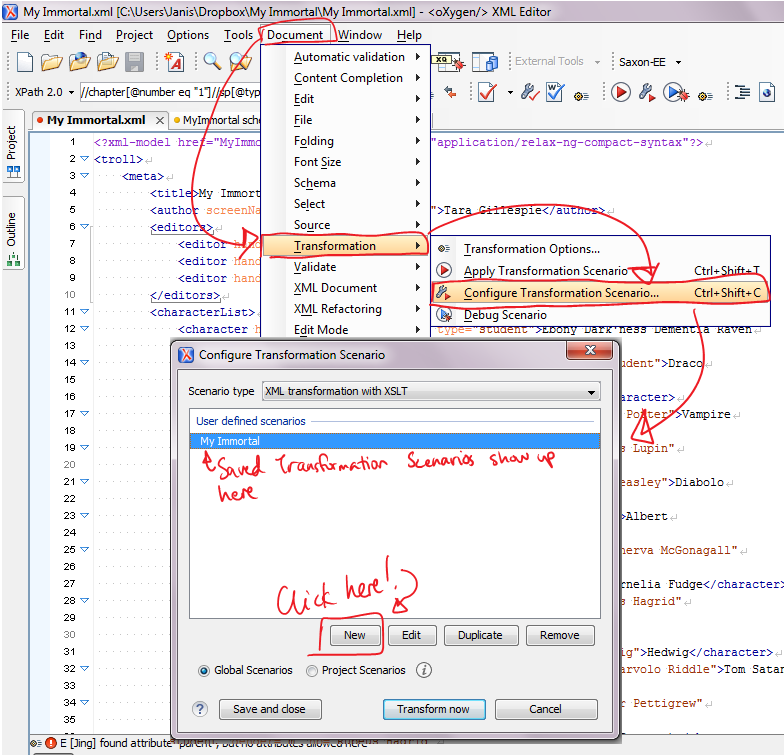
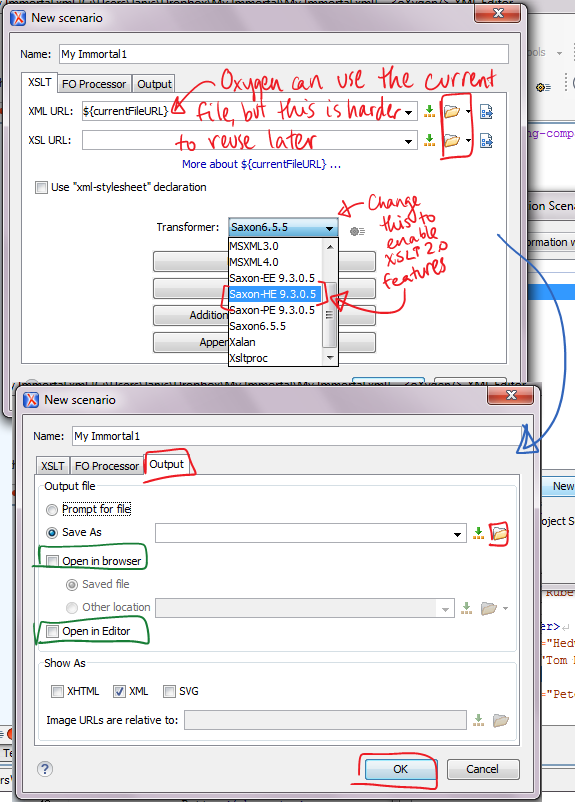
As is illustrated below, start by going to that same Document menu and going to Transformation and then Configure Transformation Scenario. Any saved transformations will be listed, but to create a new one you ignore those and click instead on New and from Scenario type select XML transformation with XSLT. The New scenario dialog, illustrated below, then opens and asks for additional information.

You’ll need to specify both your XML and XSL files in that first tab (labeled
XSLT), along with the XSLT transformer you want to use (as we did
in class). Although <oXygen/> may try to guess which files and
transformer to use based on which file was in focus when you opened the menu, it’s safer
and easier in the long run to specify all of this information explicitly. If you’re
using XSLT 2.0 features, we’d recommend selecting either Saxon PE or Saxon HE as the
transformer. To the right of the XML URL and XSL URL
boxes you can click on the little folder icons and navigate to the XML and XSLT files
you want to use for the transformation. <oXygen/> will let you set one or both to
Current file
and a few other variable values, but when we do that, we often
have the wrong file in focus when we run the transformation, yielding the wrong result,
so it’s safest just to specify both files fully. In the Output tab you
need to specify the location and name of the HTML file you want to create, and you can
select to view the file in <oXygen/> and/or in your Internet browser if you want
(see the green highlighting in the illustration). When you’re all done,
hit OK, run the transformation, and then upload your new HTML file to
your project directory on the server and link to it, so that users can access it
easily.

If, in the future, you wish to run this scenario again, simply navigate the menus again and select Apply Transformation Scenario instead of Configure Transformation Scenario (although you can actually do it from either, as noted above), and select the scenario you wish to run. You’ll need to re-upload your HTML file, if you regenerate it, to replace the old version on the server.