![Creative Commons BY-NC-SA 3.0 Unported License [Creative Commons BY-NC-SA 3.0 Unported License]](http://www.obdurodon.org/images/cc/88x31.png) Last modified:
2023-02-10T01:58:08+0000
Last modified:
2023-02-10T01:58:08+0000
Maintained by: David J. Birnbaum (djbpitt@gmail.com)
![Creative Commons BY-NC-SA 3.0 Unported License [Creative Commons BY-NC-SA 3.0 Unported License]](http://www.obdurodon.org/images/cc/88x31.png) Last modified:
2023-02-10T01:58:08+0000
Last modified:
2023-02-10T01:58:08+0000
This tutorial describes how to upload content to your websites, which you will need to do for both a few homework assignments and your project.
The first step is to install some variety of SSH/SFTP (secure shell and secure file transfer protocol, respectively) client.
On Windows we use PuTTY for SSH and WinSCP for SFTP, and you can download both from https://www.technology.pitt.edu/software/student.
On MacOS we use the built-in command-line
ssh application for SSH and Cyberduck for SFTP.
Linux comes with both command-line ssh and
command-line sftp commands built in, and
does not require any third-party software.
This posting features screencaps for Windows, but the principle is roughly the same on MacOS. Linux users can view the required command lines below. Before proceeding, install the application mentioned above, in this paragraph, that are appropriate for your operating system: PuTTY and WinSCP for Windows and Cyberduck for MacOS.
To change your password you need to connect to Obdurodon with SSH, using PuTTY on
Windows and command-line ssh (see below) on
MacOS. Before you do anything else, you need to replace the default password that we
set up for you when we created your account with a strong password. You only have to
do this once; once you’ve changed your password, the system will remember the new
one.
About passwords:
Before you do anything else, decide what your new password will be, so that you’ll be ready to type it when prompted.
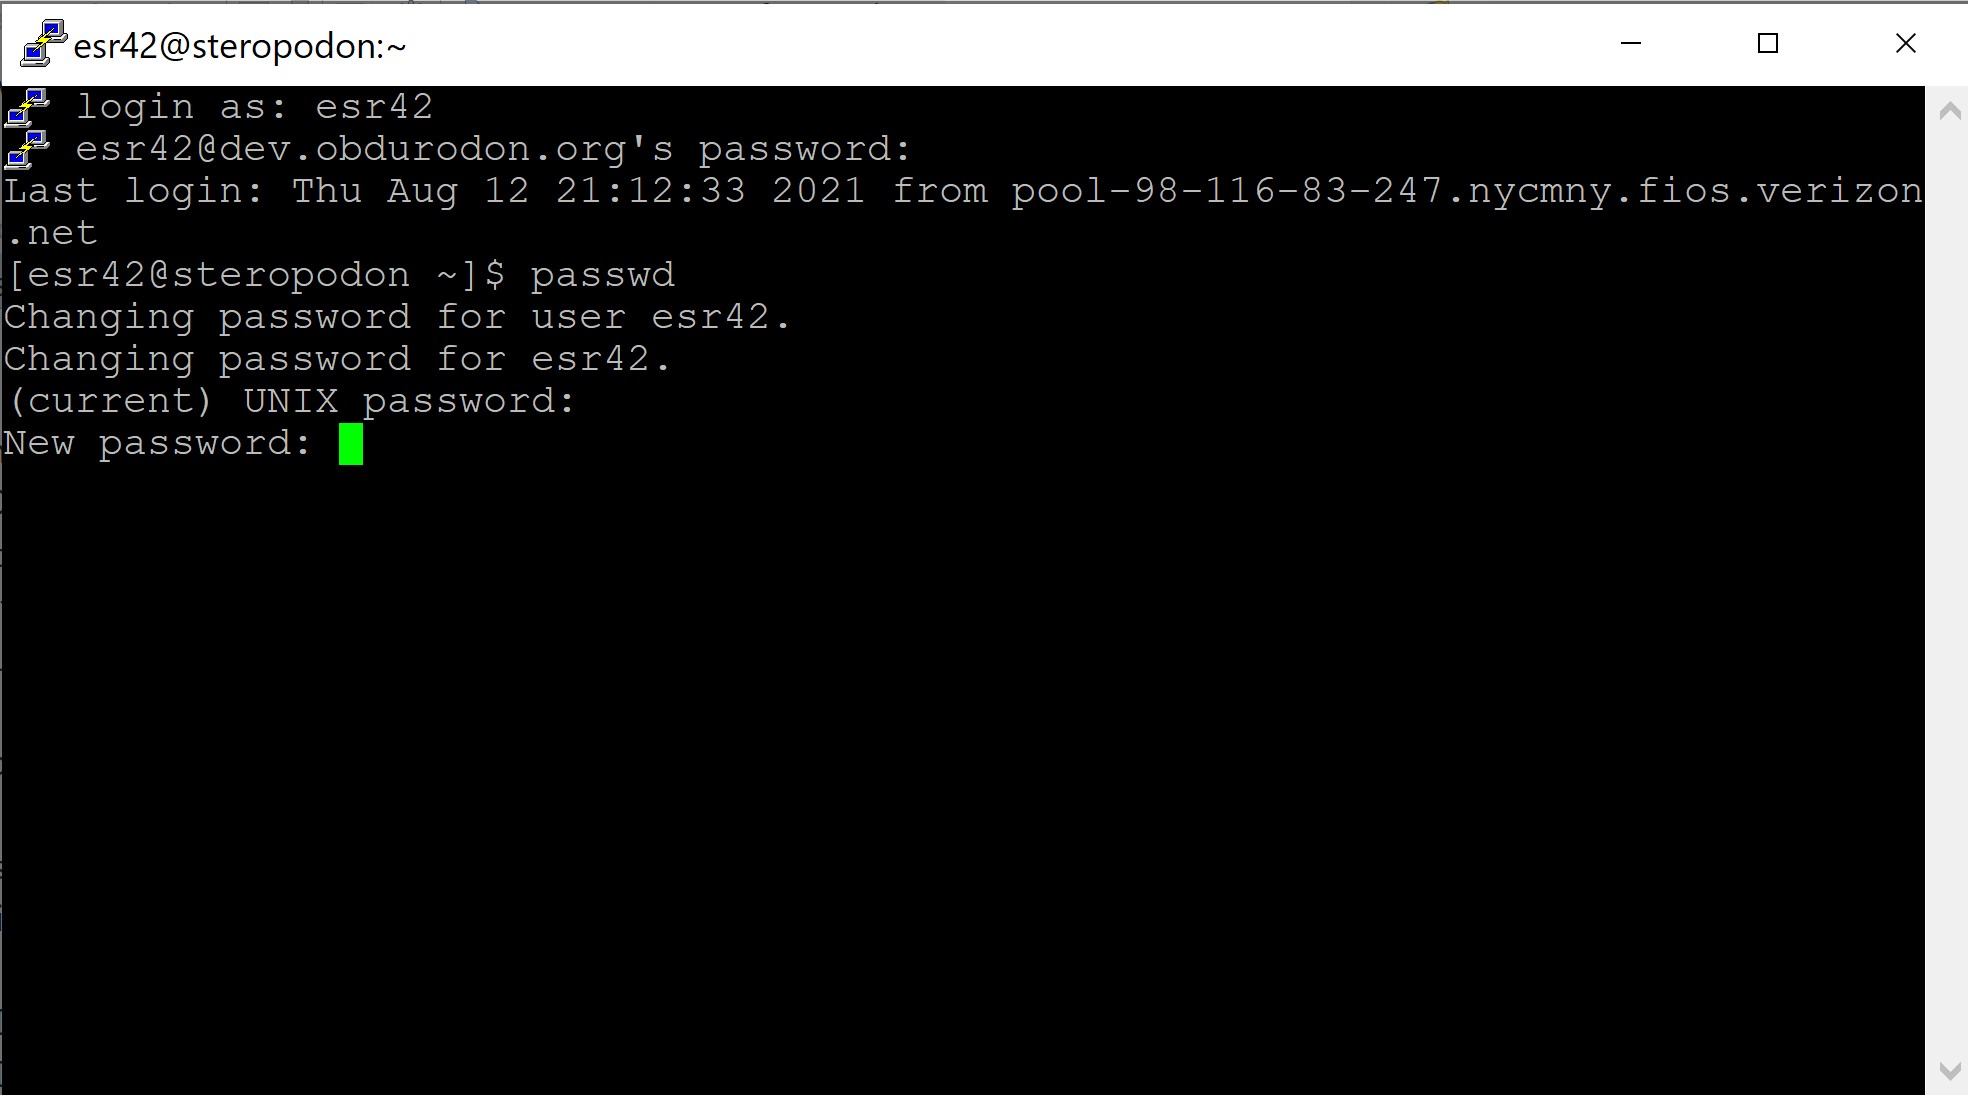
To connect to Obdurodon on Windows, open PuTTY and begin by entering the host name
(dev.obdurodon.org) and port number (we’ll tell
you this in class) and select Open in PuTTY
from the dropdown next to the
Login button. You will be taken to the PuTTY terminal. Under
login as:
, type your userid (which will be the same as your Pitt userid)
and hit Enter
. Then, type your current password on Obdurodon (not your Pitt
password; your initial password on Obdurodon will be the one we set up for you, and
after you finish changing it, it will be the new one that you’ve specified) and hit
Enter
. When you type your password it may look as if nothing is
happening; this is a security feature, in case anyone is watching over your shoulder
while you type. Typing your userid and password completes the login process, and
PuTTY will display a command-line prompt, which looks something like (except that
you’ll see your own userid instead of
esr42),:
[esr42@steropodon ~]$At this point Obdurodon is waiting for instructions about what you want it to do. You
should now type the command passwd (note the
spelling!) and press Enter, which will initiate
the process of changing your password. You’ll be prompted to supply your current
password (the one you used to launch the connection), so type it (it will look as if
nothing is happening) and press Enter
. At that point you’ll be prompted to
type your new password and then hit Enter
, and you’ll be asked to do that
twice. Here, too, even though it will look as if nothing is being typed, it's
working! Once you’ve entered your new password twice, you’ll be returned to the
command prompt. Your new password has now replaced the old one, so the next time you
connect to Obdurodon, use the new password.

MacOS users can log into the command-line to change their passwords with the
ssh program by typing:
ssh -p port-number -l userid dev.obdurodon.orgReplace port-number with the number we tell you in
class and replace userid wth your own userid.
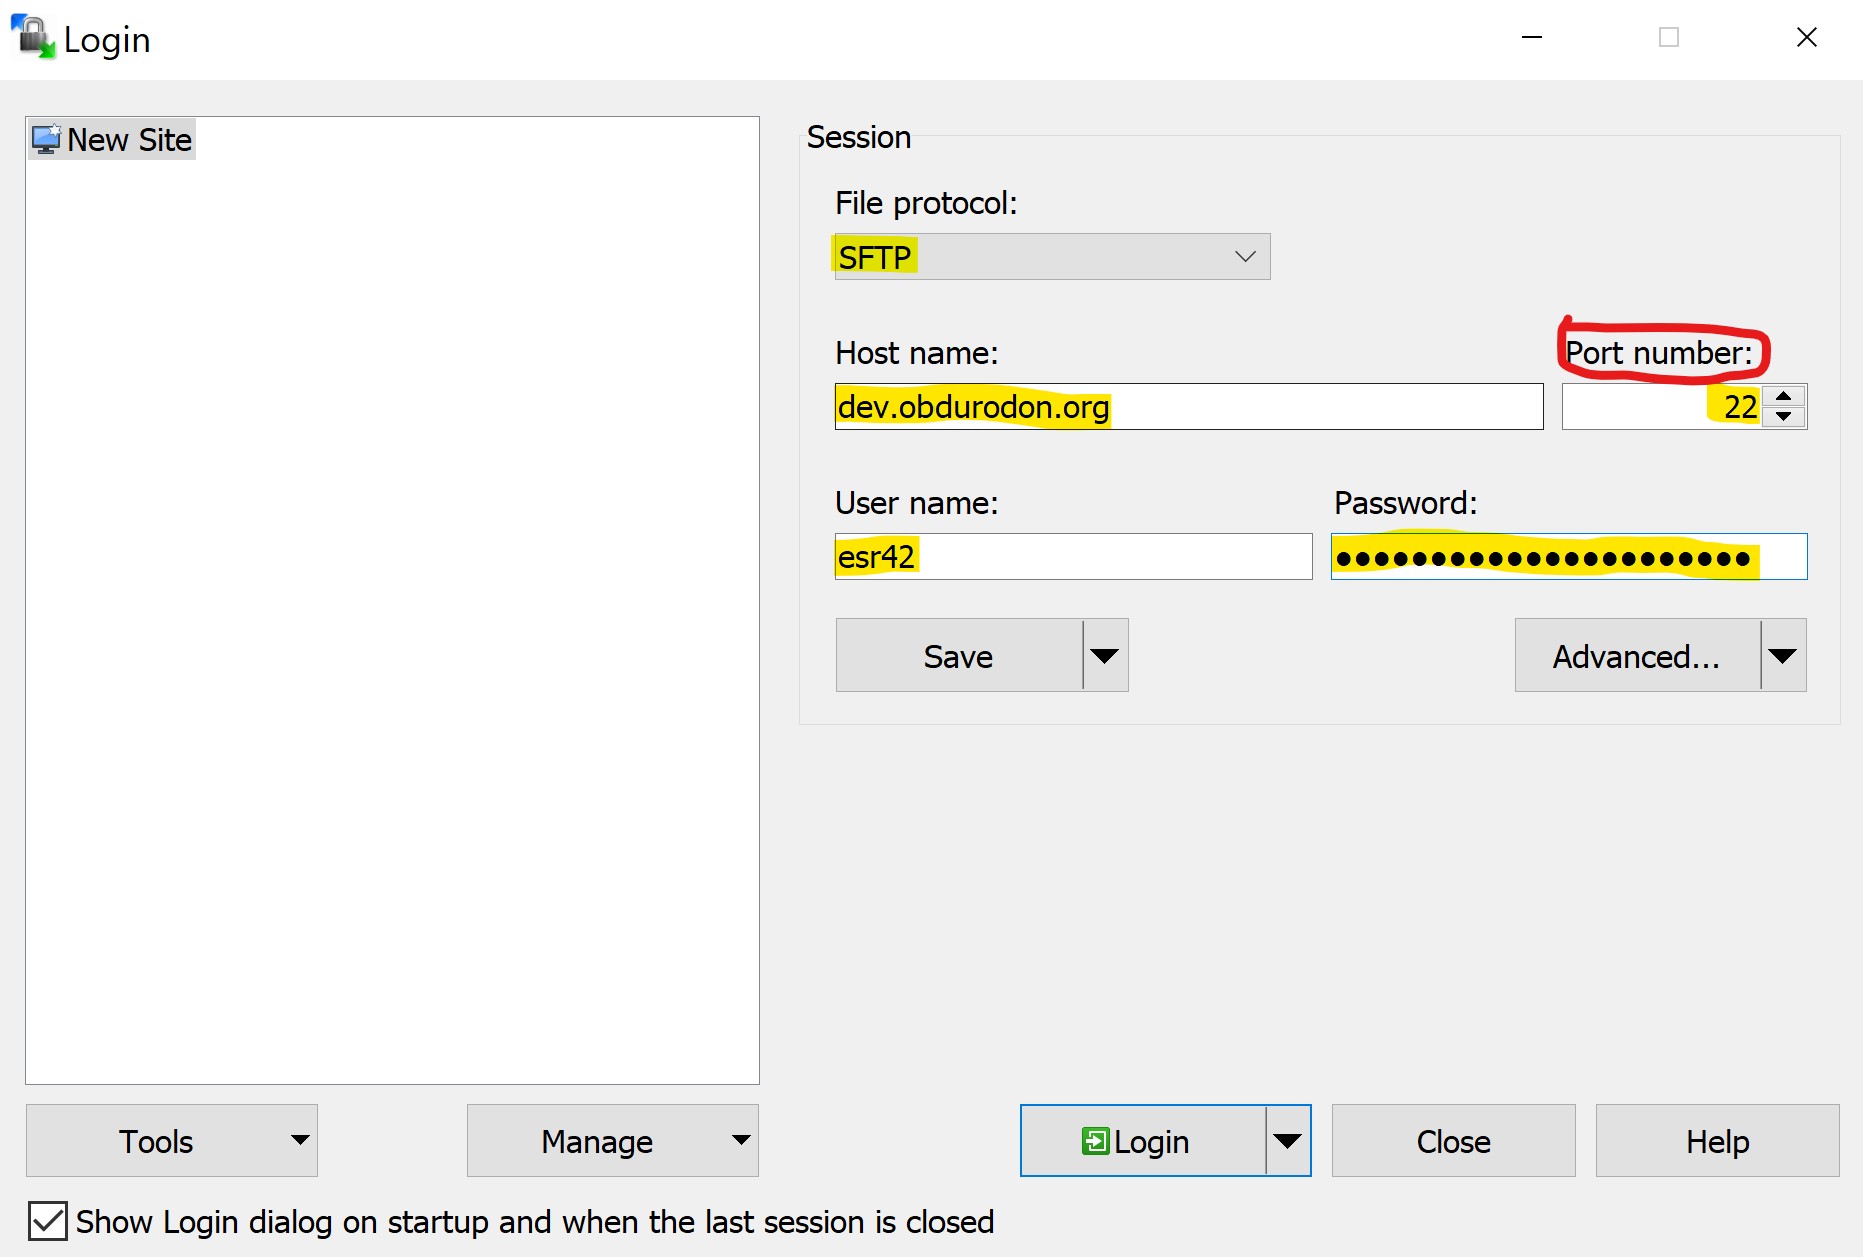
Once you've installed WinSCP SFTP client (or Cyberduck on MacOS) and asked to start a
connection, a login screen consisting of a dialog box will open for you to fill in (see
below). Should you close the dialog box for any reason, click New
Session, and it will reappear. The file protocol is SFTP
. The host
name is dev.obdurodon.org, and the username is the
name on your account on the server. For security reasons we do not publish the port
number here (the number below, 22, is the standard one, but we use something different);
we’ll tell you the actual port number in class. Finally, fill in your username and
password in the appropriate fields. We’ve filled all this in below (with the exception
of the port number, as discussed). When you’re done, click the Login
button.

Navigation in this SSH (secure shell) window (called a shell
or command
line
session) is done using unix shell commands, a list of which you can find on
line at http://mally.stanford.edu/~sr/computing/basic-unix.html. You don’t need to
memorize all of these commands; you’ll probably need only a few of them for the limited
work you’ll be doing here on the command line, and you can come back and look them up
again if you forget. The commands we use most are ls,
and cd, which list
the files in the current directory and change
directories, respectively.
We use PuTTY (Windows) and the built-in MacOS ssh
command only to work at the command line, and you shouldn’t have to do that very often.
You’ll spend more time uploading files, and we use different applications for that:
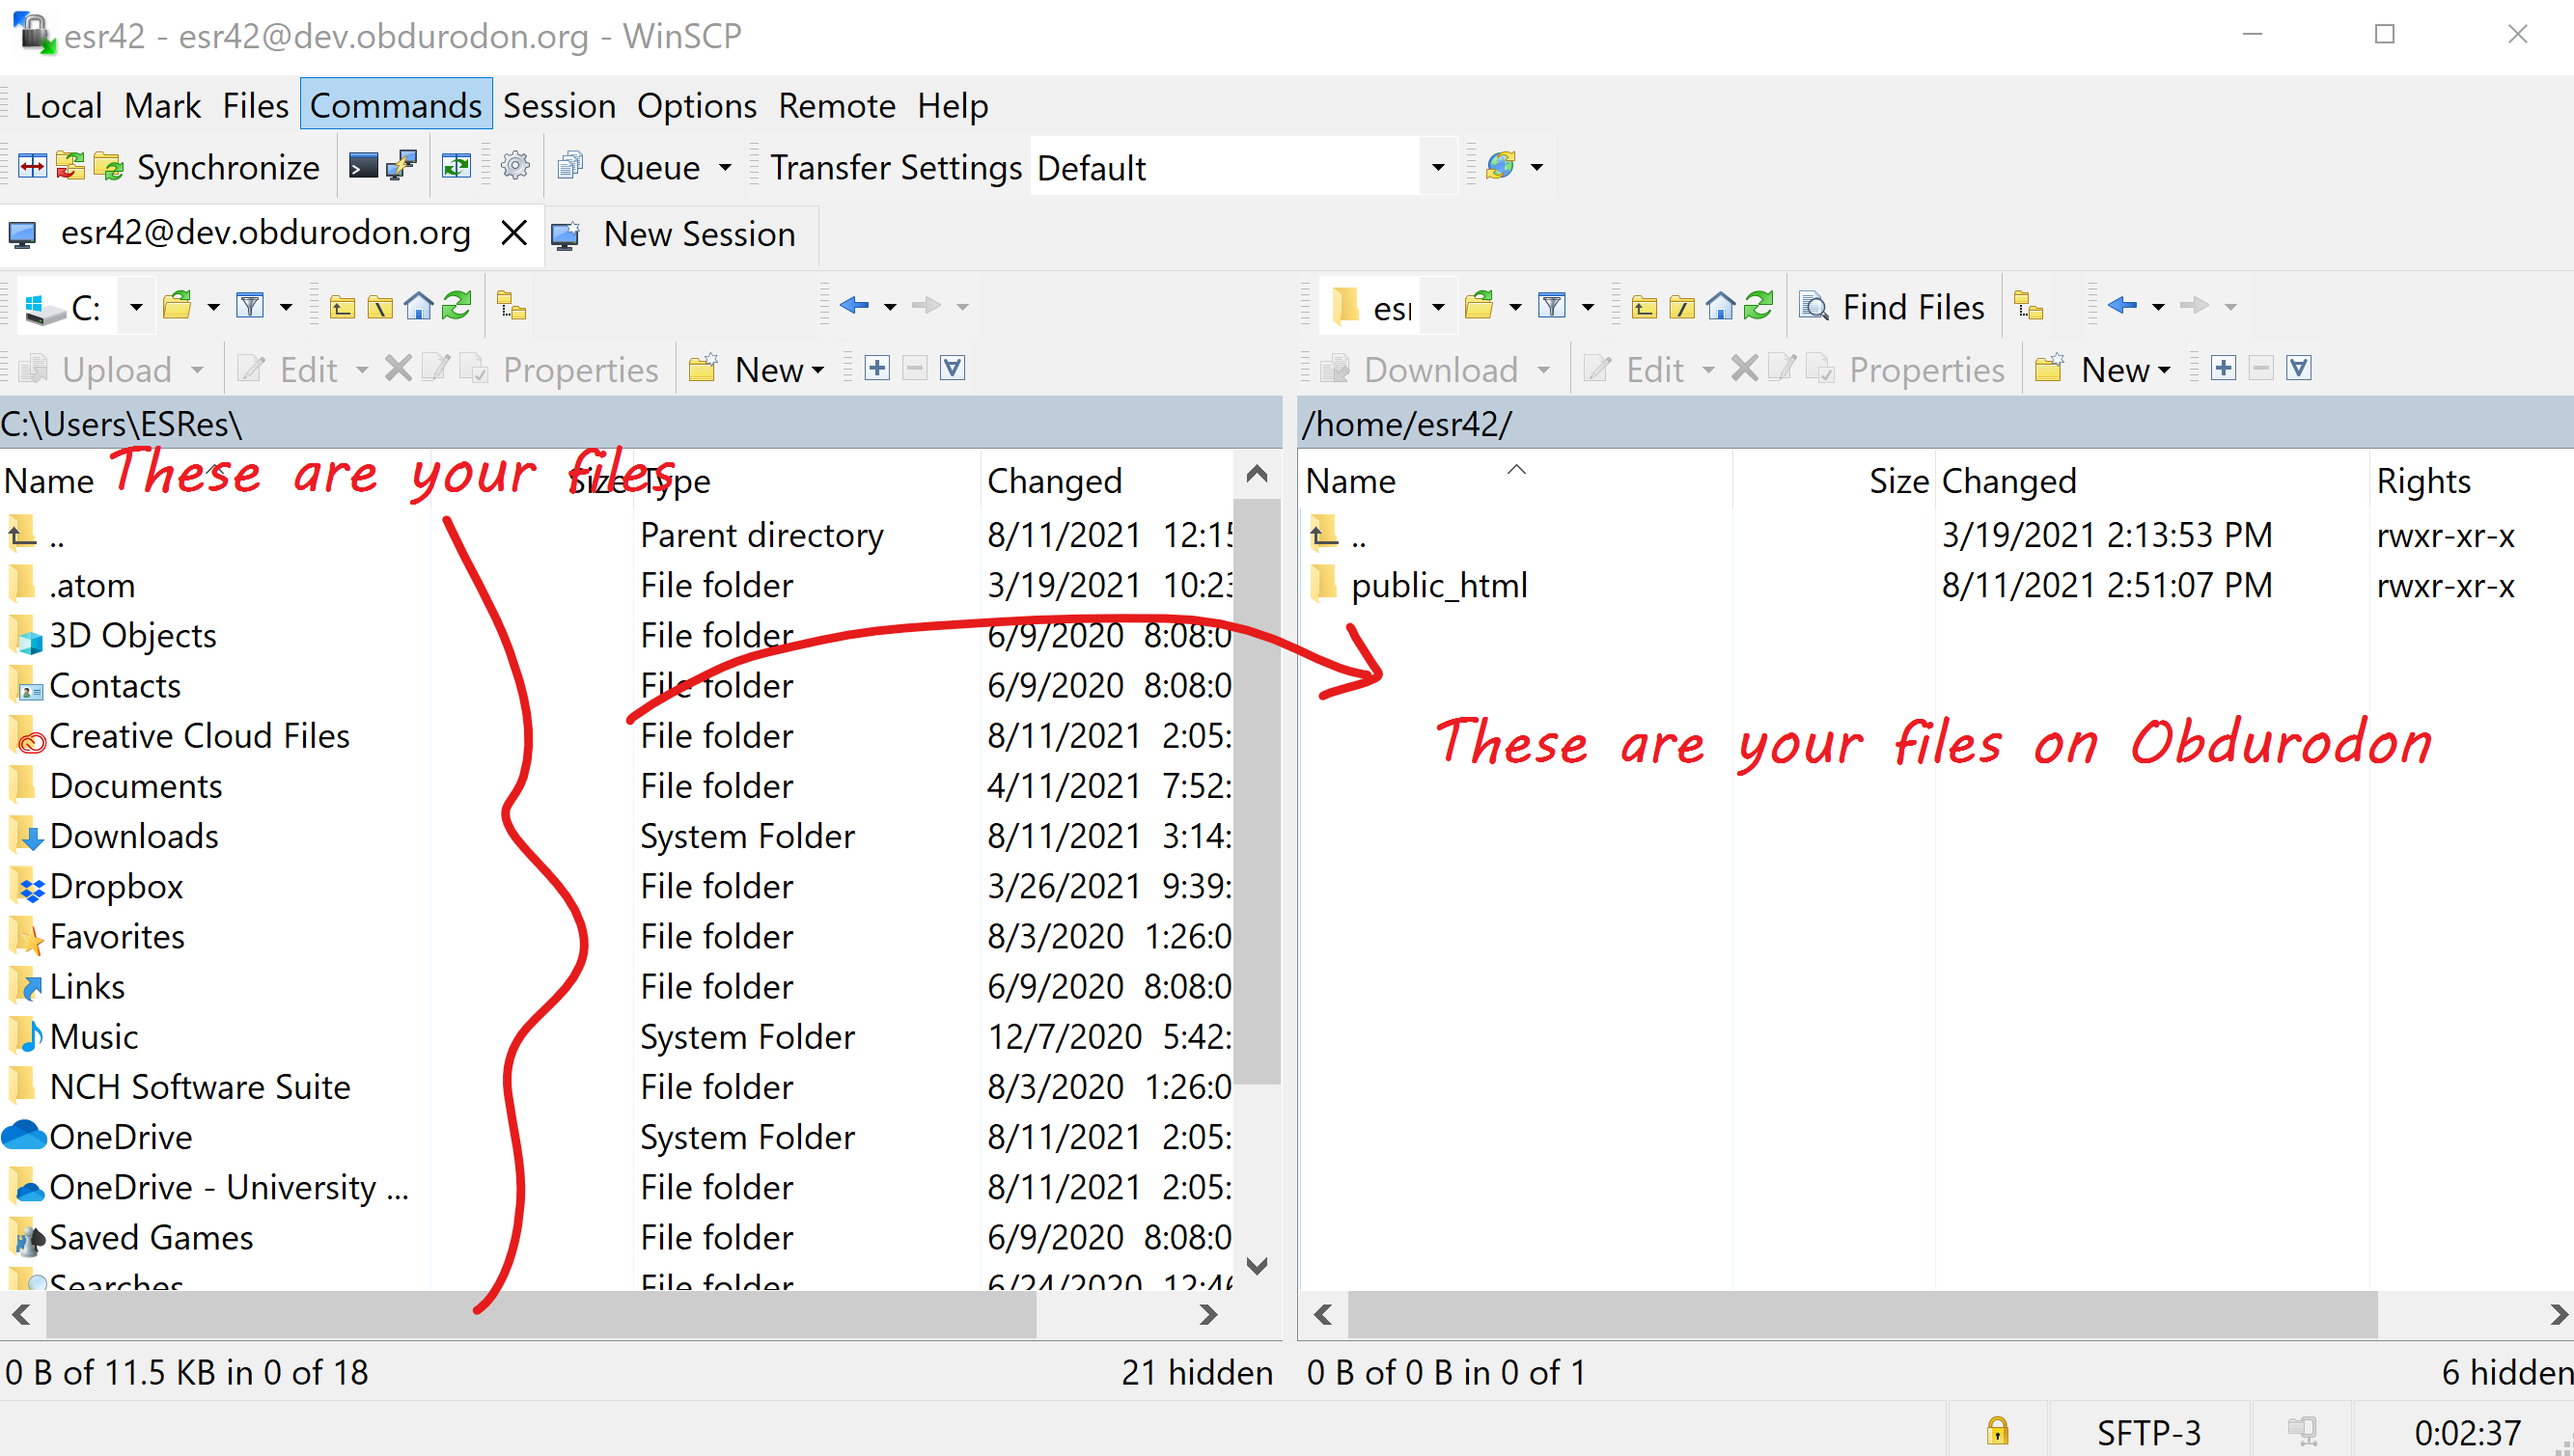
WinSCP for Windows and Cyberduck for MacOS. The interface will look something like the
following (this image is from WinSCP):

The left pane is a view of your local files (My Documents and the like), while the right pane is a view of the files on Obdurodon. The right pane will open by default to your home directory folder. You’ll put files for your private web pages (such as homework assignments) in the public_html subdirectory of your home directory; you can double-click on the name to move into it. You’ll put files for your project in a separate project directory, and we’ll show you how to do that later.
The easiest way to transfer content between your local machine and obdurodon is to click and drag a file (or files) across panes to do either action.
Files live in directories on the obdurodon file system, but users access them
through uniform resource locators (URLs), which are the web addresses we type
in the address bars of our browsers. We’ll explain the relationship between file system
locations and URLs later, but for now you should know that you should put personal
(non-project) files in the public_html subdirectory of your home directory, and
that the URL for a file called, say, myFile.xhtml that belongs to user
jec115 would be
http://dev.obdurodon.org/~jec115/myFile.xhtml. Substitute your own username
and your own filenames for your own materials.
There’s one exception to the rule that visitors must know the filename in order to find a
file because that name is part of the URL. Your main home page (whether in your personal
directory or your project directory) should be called index.xhtml. The reason for
this is that when you navigate to your directory and don’t specify any filename, the
server knows to look for a file called index.xhtml. That is, a user who goes to
http://dev.obdurodon.org/~jec115/ will automatically be taken to a file
called index.xhtml in the public_html directory of user
jec115. If there isn’t an index.xhtml file in
that directory, going to http://dev.obdurodon.org/~jec115/ will generate an error
message, and users will have to know the exact name of a file in order to load it.
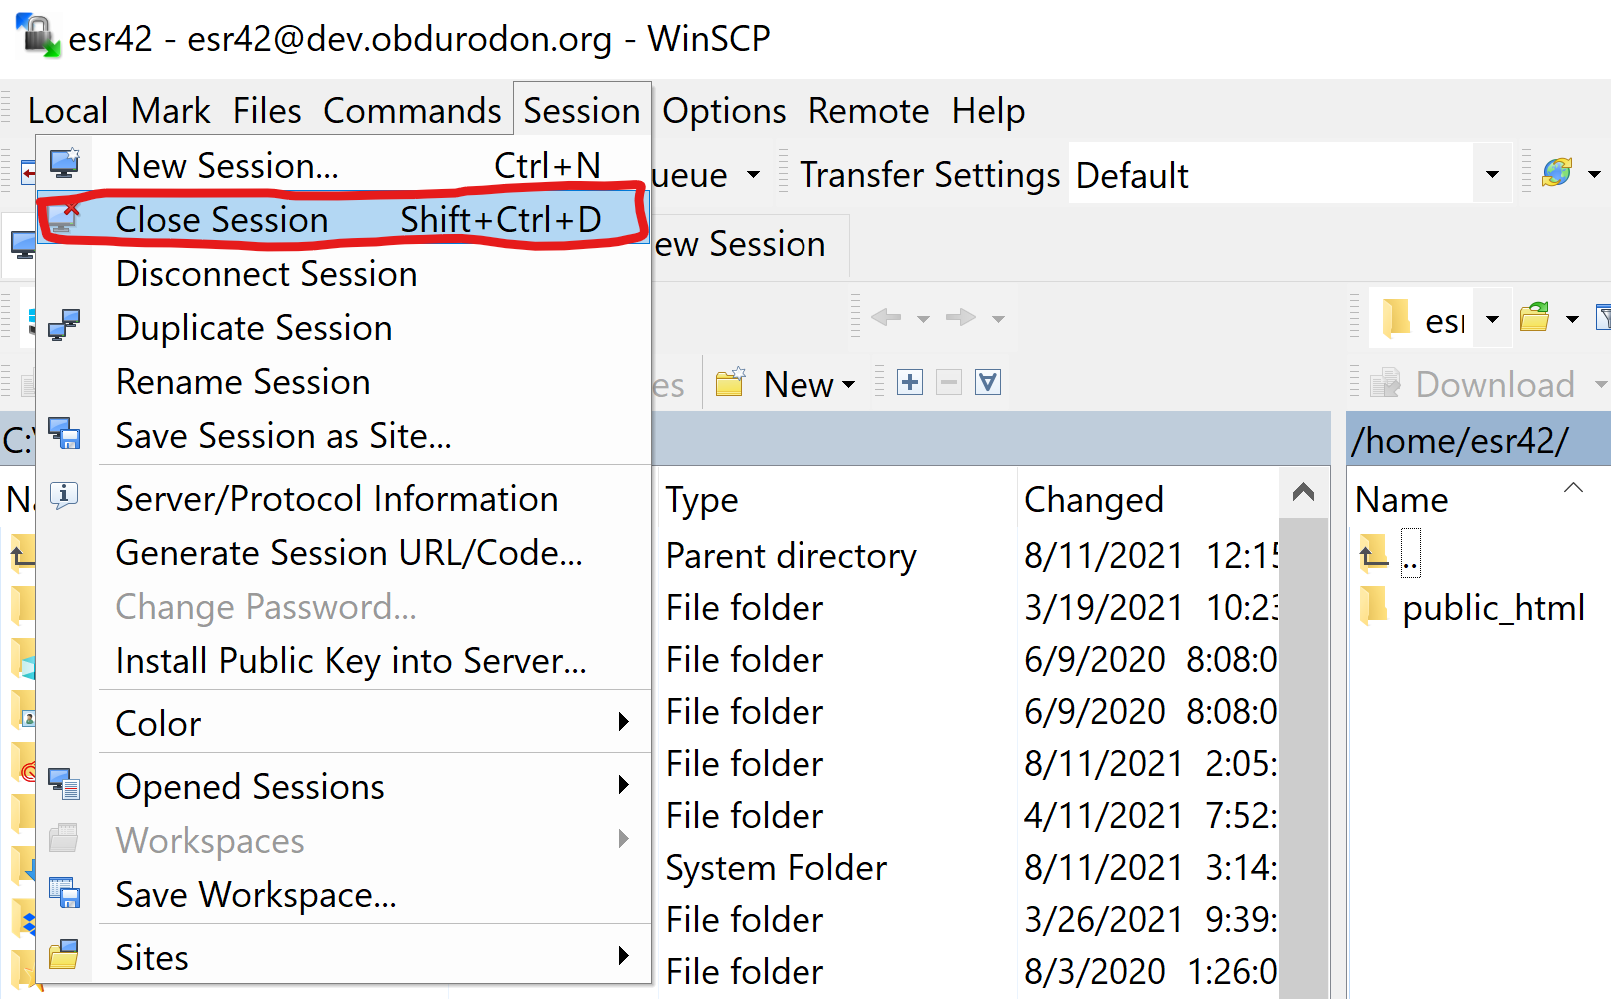
When you’re all done, you can exit just close the File Transfer window as you would close
any window on your computer, but you should disconnect from obdurodon before closing the
SSH window. You can do this via the Session menu by picking
Close Session, you can click the button that looks like a computer
with a red line through it, or you can hold down the control
key, shift
key and type the letter d
. After that, you can close the window as usual.

Open the shell by pressing ctrl + alt + T
and browse to the directory where you
keep your project files or homework
(cd directoryLocation). Alternatively, you
can install the Nautilus open-terminal package first by typing:
sudo apt-get install nautilus-open-terminal
(apt-get is for Ubuntu; other Linux distros may use
alternative commands). This will allow you to open a terminal wherever you are by
right-clicking and selecting Open in Terminal
.
To upload files you have to connect through SFTP. To do that, type the following line,
replacing XXXXX
with the port number you were given in class:
sftp -P XXXXX yourUserName@dev.obdurodon.org. Type
your password when prompted to do so.
If you get an error message, the problem might be related to the default port number
the client is listening to. To change it type:
sudo gedit /etc/ssh/sshd_config and edit that
information. Save it and type
sudo restart ssh.
Once you have logged in, use the command line to go to the directory you want to upload
files to. If you want to upload your homework, go to:
cd public_html. If you want to access your project
directory, browse instead to:
cd /var/www/html/projectKeyword.
Since we opened the SFTP connection after positioning ourselves in the directory where we
keep the files we want to upload, we only need to use the command
put followed by the name of the file to upload it
(remember that the extension is always part of the file name, so, for example, to upload
file.xml
you need to type put file.xml,
and not just file). If the files you want to upload
are in a different location, you’ll need to type a path to reach them. If you don’t know
how to do that, ask an instructor, or just close the connection, navigate to the correct
location on your system, and open a new connection from there.
In addition to the commands we’ve already used (cd to
change directories and put to upload files), the most
common ones are ls to list the files inside the
current directory and rm followed by the file name to
remove them. You can find a more complete list of available commands at http://mally.stanford.edu/~sr/computing/basic-unix.html.
To see the files you have uploaded to your personal subdirectory (that is, the homework you uploaded to your public_html subdirectory) in a browser, visit the URL: http://dev.obdurodon.org/~yourUserName/yourFileName.
Some actions, such as changing the permissions of a file or removing directories, must be
done through SSH instead of SFTP. The command line you need to initiate an SSH
connection is:
ssh -p XXXXX yourUserName@dev.obdurodon.org.
Notice that in SFTP we need to use an upper-case P
to specify the port and in SSH
we need to use a lower-case one.
To disconnect at the end of your session, type
ctrl + D.