![Creative Commons BY-NC-SA 3.0 Unported License [Creative Commons BY-NC-SA 3.0 Unported License]](http://www.obdurodon.org/images/cc/88x31.png) Last modified:
2021-12-27T22:03:46+0000
Last modified:
2021-12-27T22:03:46+0000
Authors: Devon Broglie and Rebecca Parker
Maintained by: David J. Birnbaum (djbpitt@gmail.com)
![Creative Commons BY-NC-SA 3.0 Unported License [Creative Commons BY-NC-SA 3.0 Unported License]](http://www.obdurodon.org/images/cc/88x31.png) Last modified:
2021-12-27T22:03:46+0000
Last modified:
2021-12-27T22:03:46+0000
Git is a free, open-source version control system designed to handle everything from small tasks to major projects. At its most basic, version control is a technical term for a system that manages your documents in a way that supports unlimited undo operations. Git lets you roll back to an earlier project state (thus undoing a cascade of changes). But what happens if you mess up a small section of a program you’re writing and then make changes you want to keep in a different section of the program? In that case, if you roll back to the state before you started making errors, you also lose subsequent changes that you want to keep. Git addresses this concern by allowing you to revert (undo) specific changes to parts of a file while retaining later modifications you may have made elsewhere in the same file.
GitHub (that is, https://www.github.com) is a social network site built on top of Git, which developers can use to collaborate on projects while using Git for version control purposes. There are three common ways to interact with GitHub:
In this course we use only the command line interface because that gives you the greatest control over your actions. It can be confusing at first, your instructors will help you when you get stuck, and you’ll become comfortable with it pretty quickly. In addition to the newtFire git shell tutorial, there is a condensed guide to the most important command-line commands at https://education.github.com/git-cheat-sheet-education.pdf.
When you manage a project using Git, you keep copies of all files (with additional information) on both your local machine and the GitHub server. You work on your local machine, periodically push your changes onto the server so they’ll be accessible to your project partners, and periodically pull changes made by your project teammates from the server to your local machine. This introduction will explain how to do that using the client, which new developers typically find easiest to understand and use. All three methods provide comparable basic functionality, so if you are already comfortable with one of the others, you’re welcome to continue using it. (More experienced users generally prefer the command-line client because it is more nuanced and more powerful than the graphical client, so once you’ve mastered the graphical client, feel free to start learning to use the command line [see the online Git documentation, the newtFire tutorial, or refer to this explanatory GitHub Gist repository].)
To access the three options of interaction from the desktop client, simply right click on
the repository you wish to interact with and select the desired interface: View on
GitHub
, Open in Explorer
, or Open in Git Shell
.
The images provided in this tutorial are from a Window's installation. The desktop client will look slightly different on a Mac installation.
The general procedure for managing a project on GitHub requires the following steps (explained in more detail below):
Branchand working in a
Fork, which are described with greater detail below.
It is most important when working with Git to follow our list of Best Practices.
Because GitHub is a social networking site, where people post their code so that it will be accessible to others, using it requires creating an account. You can create a free account by navigating to https://www.github.com. You are not required to create an account using your pitt.edu address, although if you associate an educational email address with your account, GitHub will give you additional benefits.
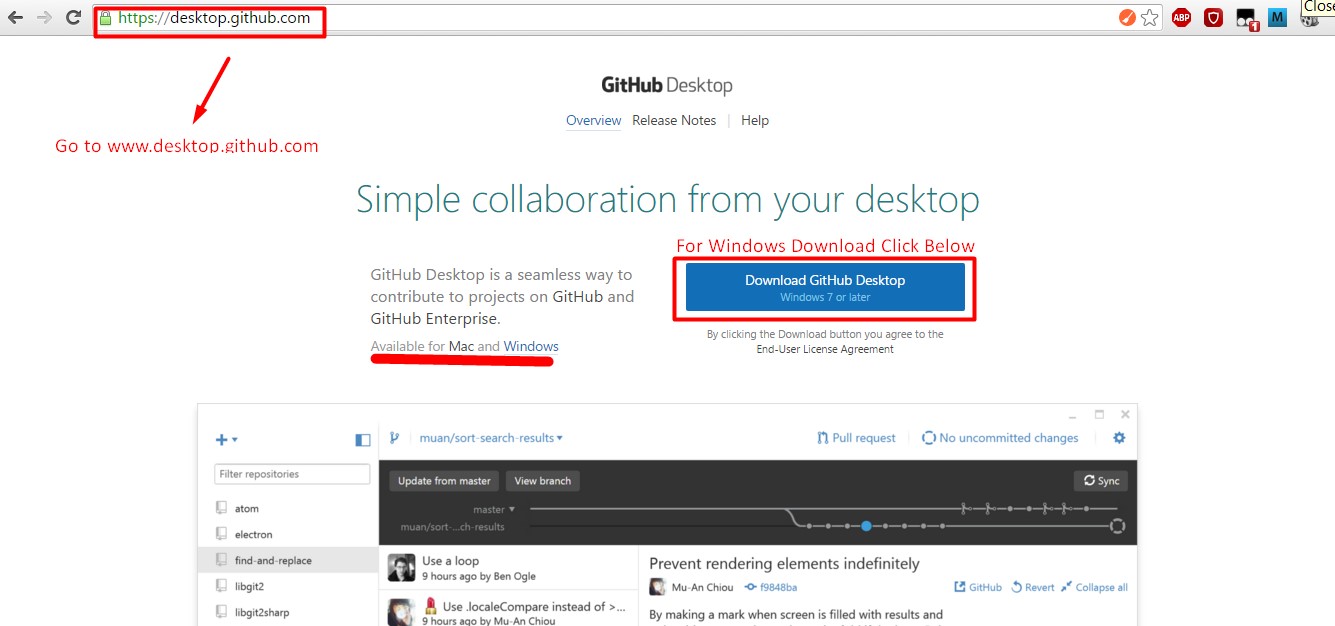
Click here to see our step by step walk through for creating an account.Next, you need to install GitHub Desktop. Choose your operating system (Windows or MacOS).
If you use MacOS 10.6 (Snow Leopard): The MacOS client provided by GitHub requires MacOS 10.7 or later. If you use an earlier version of MacOS and are unable to upgrade, you can use an alternative Git client (such as Git-Tower or SmartGit) or the command line tools.
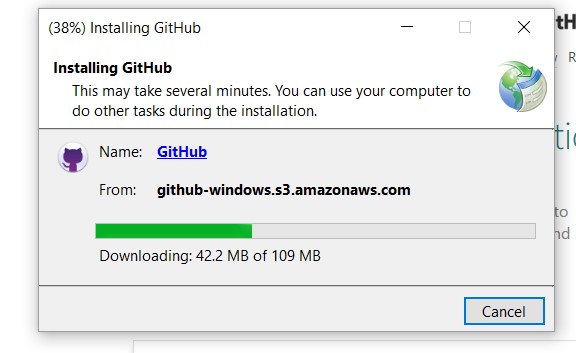
When the installation has completed, open the new GitHub client:
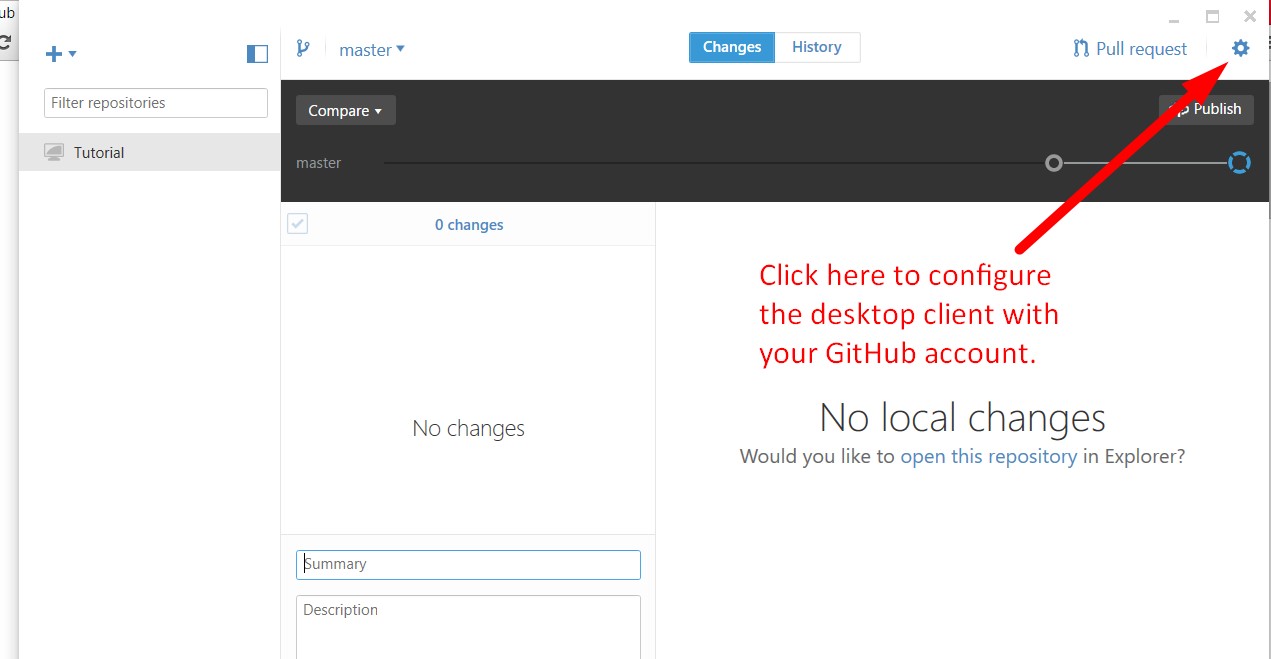
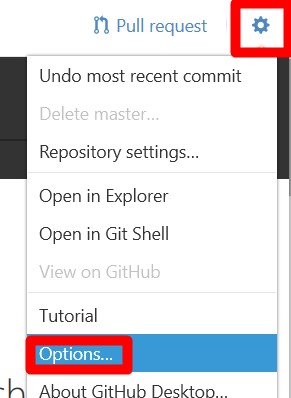
From here you will need to link your Desktop Client to your GitHub Account.
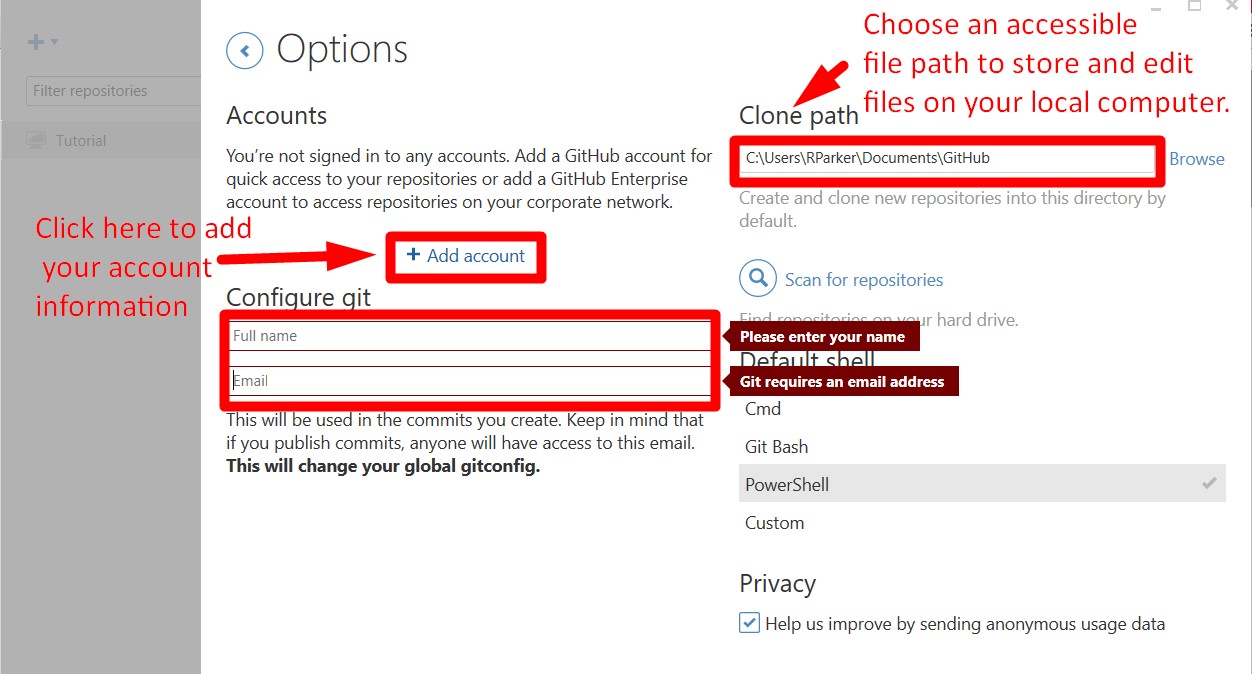
Projects on GitHub are stored in repos (short for repositories
), which
you can think of as equivalent to folders or directories on your computer. Repos can
contain plain files and subdirectories, so you can use the subdirectories to organize your
project files according to whatever hierarchy makes sense to you. Initially you may want to
put all of your project files into the main repo directory, and as you add additional files
and your project becomes more complex, you can think about creating subdirectories and
distributing the files among them according to file type or other criteria. Your project
mentor will advise you about how to structure the directory space for your project.
Your main project repo will reside on https://www.github.com, which is a public server that is accessible to others. It is possible to edit files directly on the server, but the normal way to interact with GitHub, and the one that we will use in this course, is to work on copies of the project files on your own machine and then, when you are satisfied with the state of your work, to push (upload) your new or modified files to the server so that your project partners will have access to them. Similarly, when your project partners push their changes to the server, those won’t be reflected in the copies on your local machine until you pull (download) them. The process of uploading files you have modified from your local machine to the GitHub server, and of downloading from the GitHub server files that your project partners may have developed or modified and uploaded, is called syncing (short for synchronization). When you begin a work session, you should start by syncing your local project space with the server (see below), so that you’ll catch up on any changes other project contributors have made, and when you reach a stopping point in your work when you have new or updated files that your project partners need to see, you should commit (see below) and sync again. You don’t have to sync after every keystroke, but you should sync whenever you reach a reasonably stable intermediate point to which your project partners should have access.
Students are used to thinking about work as something you do in private and submit or share only when you’re finished. That isn’t the way software development on GitHub works. All project work should be conducted in your local repo and should be synced frequently with GitHub. Don’t get in the habit of working in private space with the idea that you’ll copy your work into your repo when it’s finished. And don’t put off pushing your new work. Project members should always have access to one another’s work, including at intermediary stages.
There are several ways you can create a new repo., all of which result in the repo being installed on the GitHub server with a copy on your local machine:
You can create the repo initially on the GitHub server and then clone it
(see below) to your local machine. This is the procedure we usually use in our own
work. Log into the GitHub server at https://www.github.com and click on the Repositories
tab in the center
of your account profile's screen.
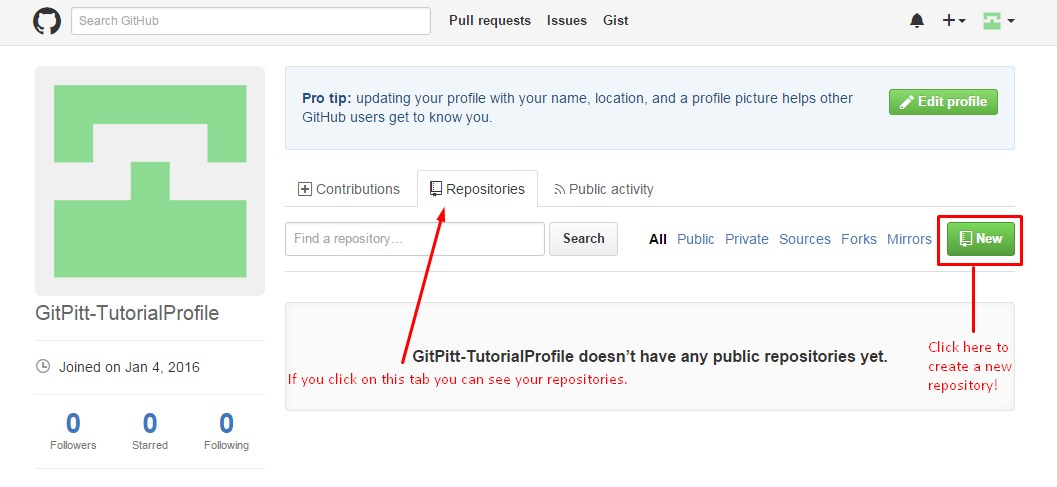
From there you will need to choose a name for the repository, add a description, and select public.
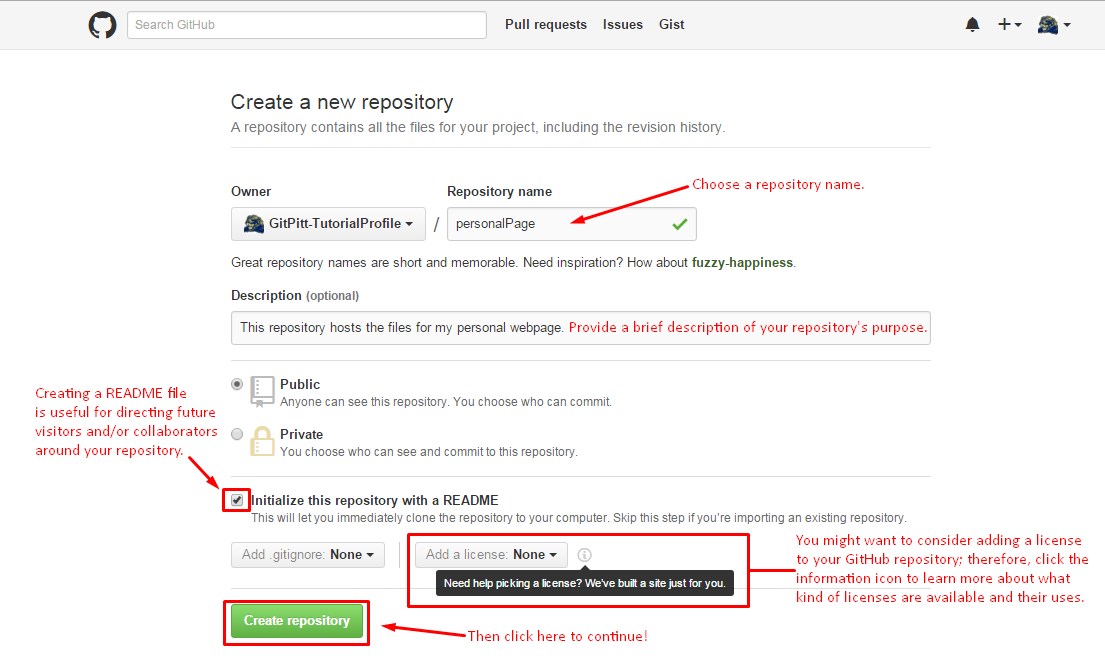
If you are working on assignments outside of this class, you may want to take
advantage of the free private repositories offered to students (more information
below), but all repos for class projects must be public. Note that GitHub repos, like
file names in our course, cannot have space characters in their names. If you try to
enter a name with spaces, GitHub notifies you that it is not valid with a red
X
.
After selecting the Create repository
button, you will be redirected to the
server page for your repository.
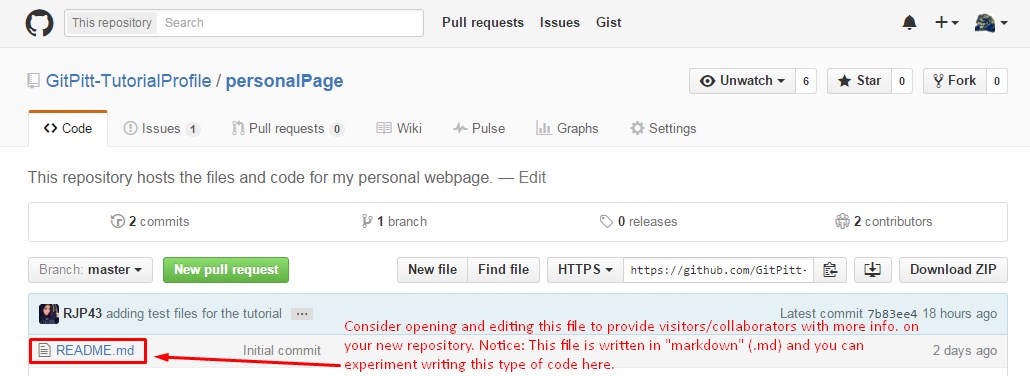
Your repository is ready for use.
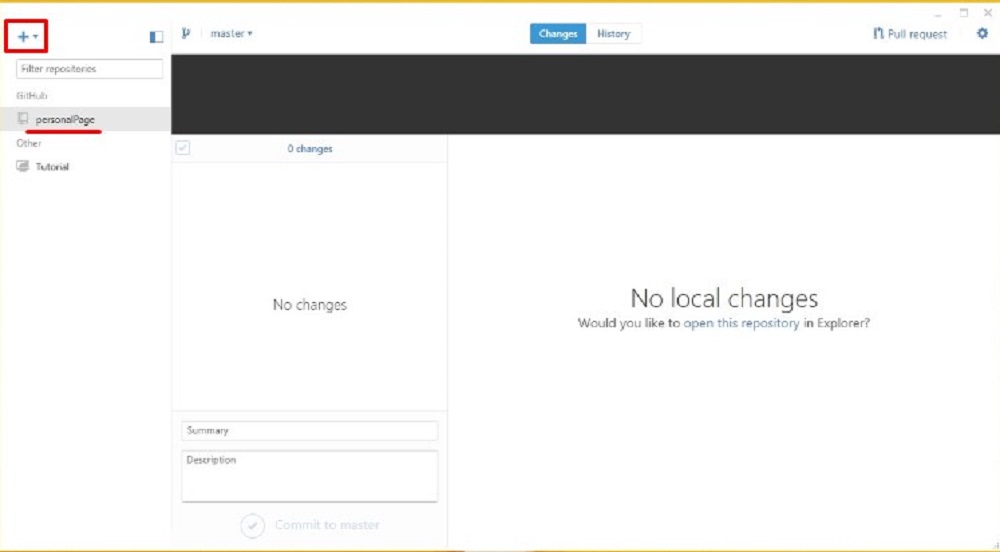
To create a repository through the GitHub desktop client, begin by opening the
desktop client. If you have previously created a repository, you should see those on
the left side of the client (for example: reference the red, underlined repo in the
image below). Click on the +
in the top left corner (boxed off with red in
image below).
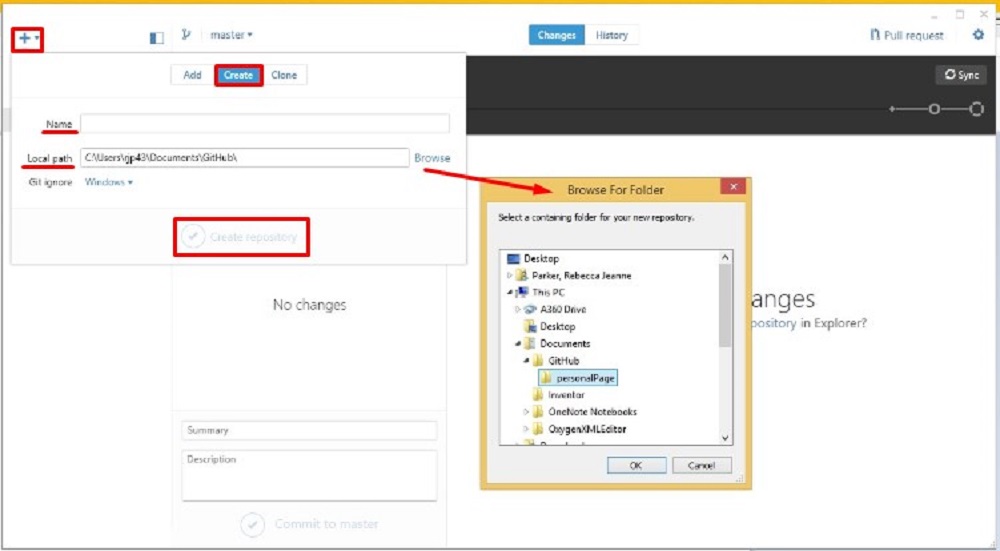
From there, click on the Create
tab. Fill in the desired name for the new
repository, and Browse
your local computer to assign a local path where your
repository will be available.
Addon the desktop client
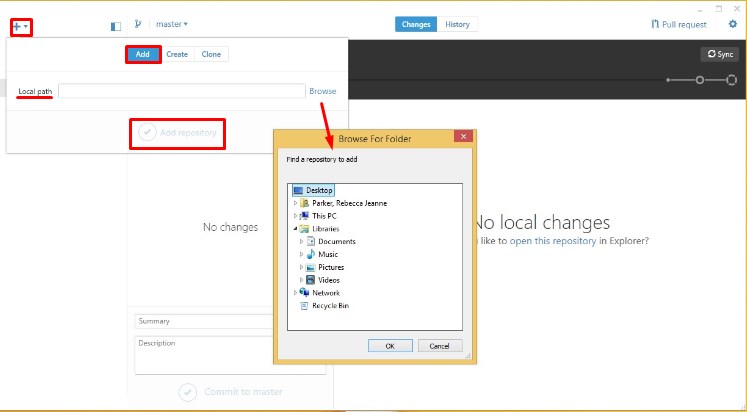
If you already have an existing folder on your computer that you are using for
project development, instead of creating the repo initially on GitHub and cloning it
to your local machine, you can configure your local folder as the repo and push it to
GitHub. Navigate to the desktop client and click on the +
sign in the top
right corner. Select the Add
tab, and Browse
your local computer to
select the a folder you wish to configure as a GitHub repository.
Another way to create a repository if you already have an existing folder on your
computer is by the drag and drop technique. To do that you can drag the folder into
the whitespace in the GitHub client under where your repos are listed, which will
copy your local repo to GitHub automatically. When hovering a folder over your
interface, the client will react. A pop-up displaying drop anywhere to add
will appear. Note: this is only applicable for folders. Individual files must be
manually added to a repository.
Alongside version control, one of GitHub’s most useful features is that it supports collaboration. Forget the days of emailing a file back and forth between group members as it is updated, or waiting to edit a document for fear of losing simultaneous edits. GitHub allows multiple collaborators to manage a repository. To add a collaborator, though, you’ll need to use the web interface, because the client is used to manage your local files (and sync them with the repo on the GitHub server), and collaborators must be added at the server level. Here’s the procedure:
Go to https://www.github.com
Sign in. Navigate to your profile.
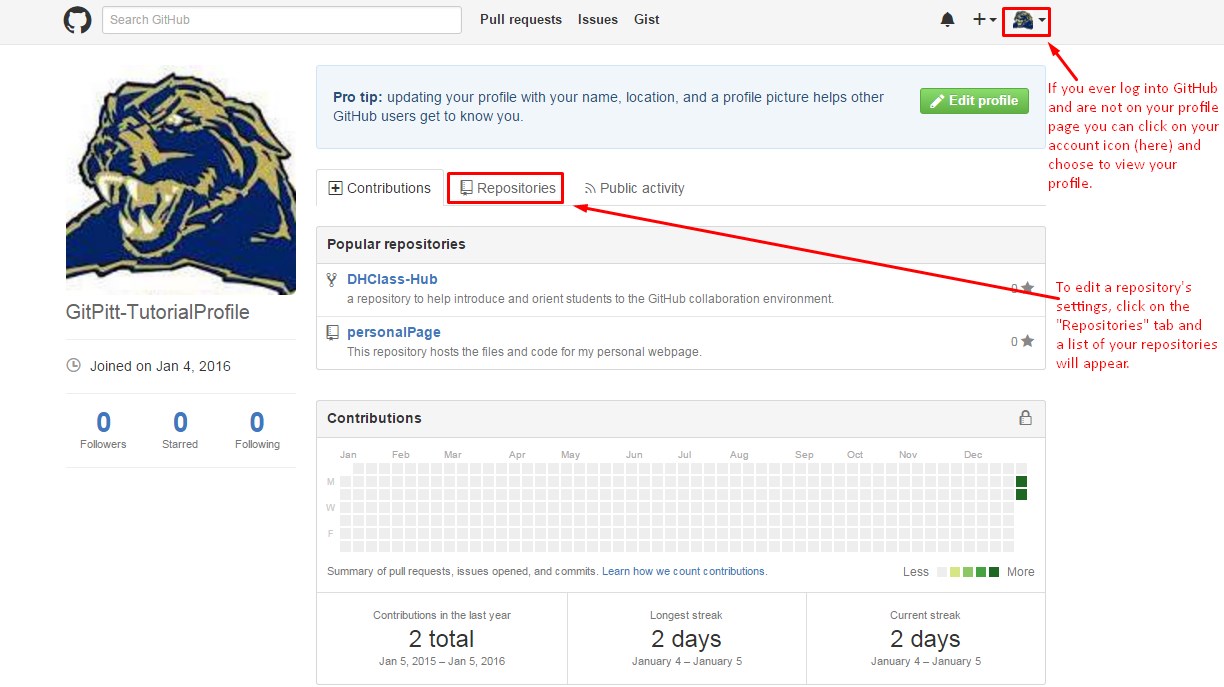
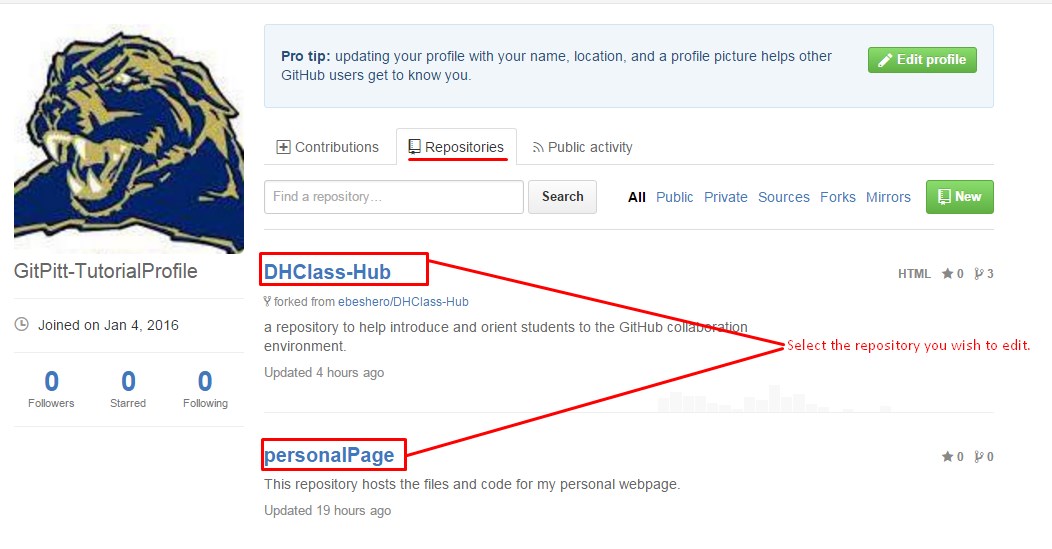
Choose the repositories
tab from your profile.
Select the repo to which you want to add a collaborator.
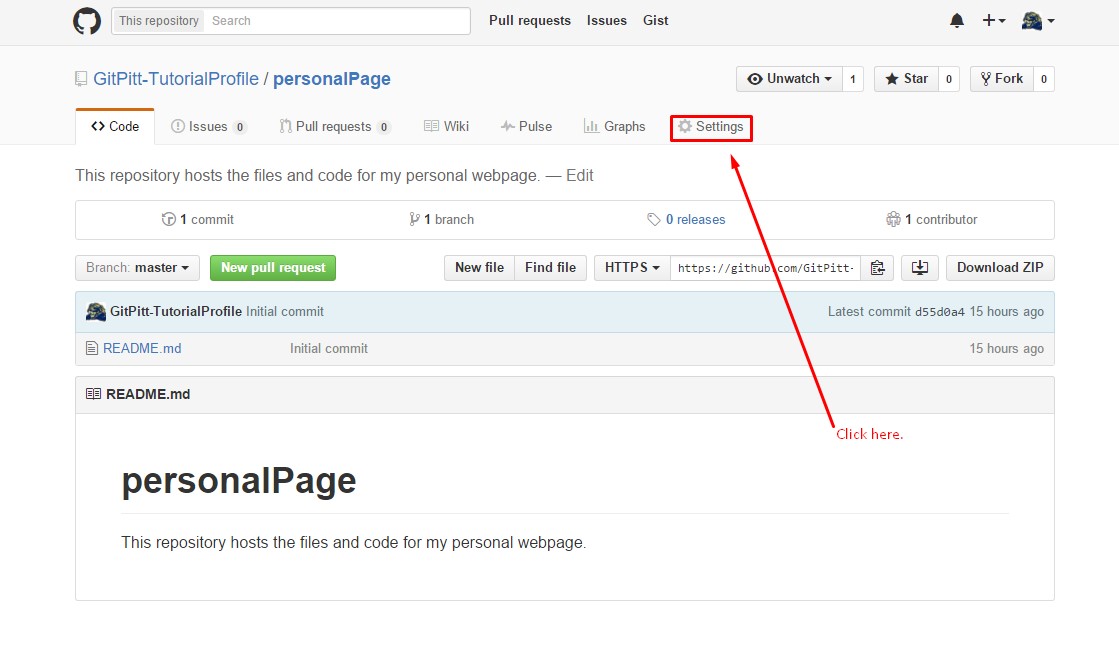
Select Settings
at the top of the screen.
On the Settings page, move to the menu on the left side of the page, and select
Collaborators
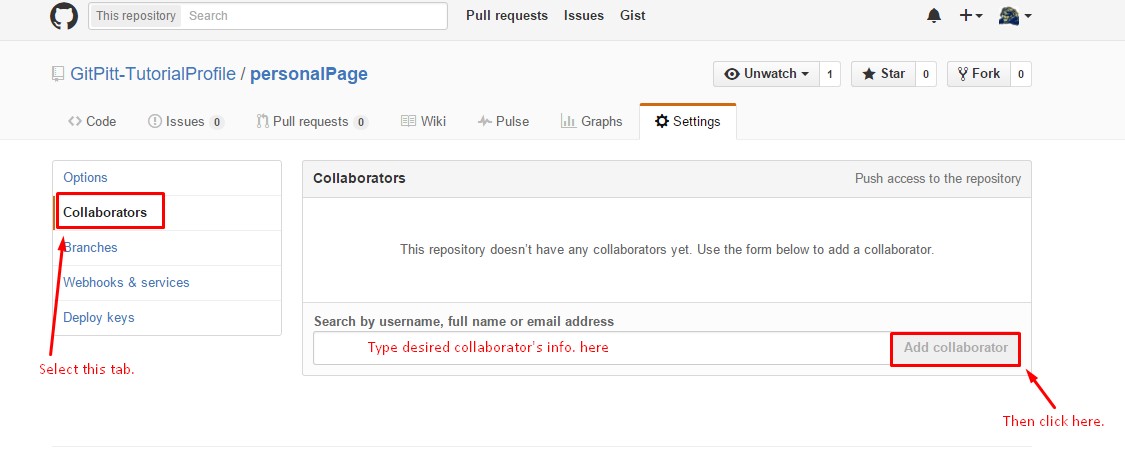
Type the user name of the collaborator you want to add. (This means that you’ll need
to ask your collaborators to tell you their GitHub user names in advance.) As you
type, a drop down list will be generated matching what you have typed. Select the
user you would like to add from the list. Then click Add
collaborator
.
As we explain above, the way you work on your project (create files, edit files, delete files) is to work on them on your local machine and then sync any modifications to the GitHub server, so that they will be accessible to your project partners. The technical term for copying a project from the GitHub server to your local machine initially so that you can begin to work on it there is called cloning. You only have to clone a project once, when you first begin to work on it (that is, cloning is copying a new project to your local computer so that you can begin to work on it; whereas, syncing is exchanging updates between your local computer and the GitHub server after you’ve already cloned the repo and established a local copy in which you can work). This working model separates saving your work to your local computer (which you should do very frequently) and syncing your local clone of the repo with the master copy on the GitHub server, a design that protects you from uploading mistakes to the server. That is, you do your development on your local machine, where only you have access to the files, and when you’re ready to share your work with your project partners, you sync (upload) it explicitly to the server.
If you created the repo initially on your local machine and pushed it to the server (see the description above about how to create a repo.), you don’t have to clone it because it already exists on both the server and your local machine. If, though, you created the repo initially on the server, as we usually do, you need to clone it, and the same is true if you aren’t the person who created it—for example, if your project partner created the repo and added you as a collaborator.
As noted above, to contribute to a repository (create new files, edit and modify existing files, etc.), it’s first necessary to clone the repo from GitHub to your local directory. There are two ways to do this:
To clone a repository from the GitHub server, navigate to the repository and click
the icon to the right of the Download Zip
button. Refer to the image
below:
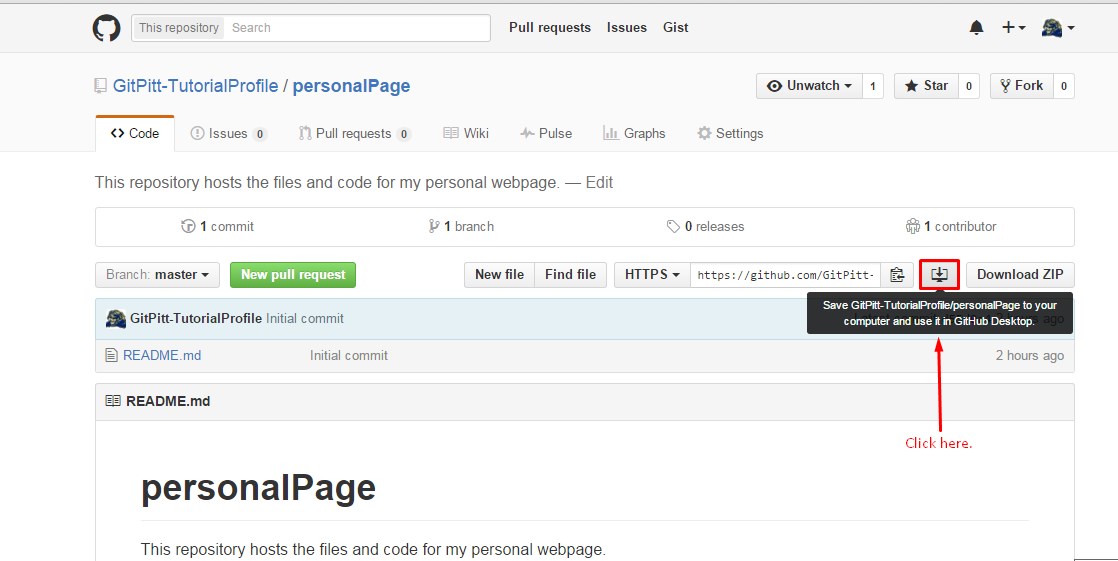
This will launch the Desktop Client where you will need to save the cloned repository to your local machine.
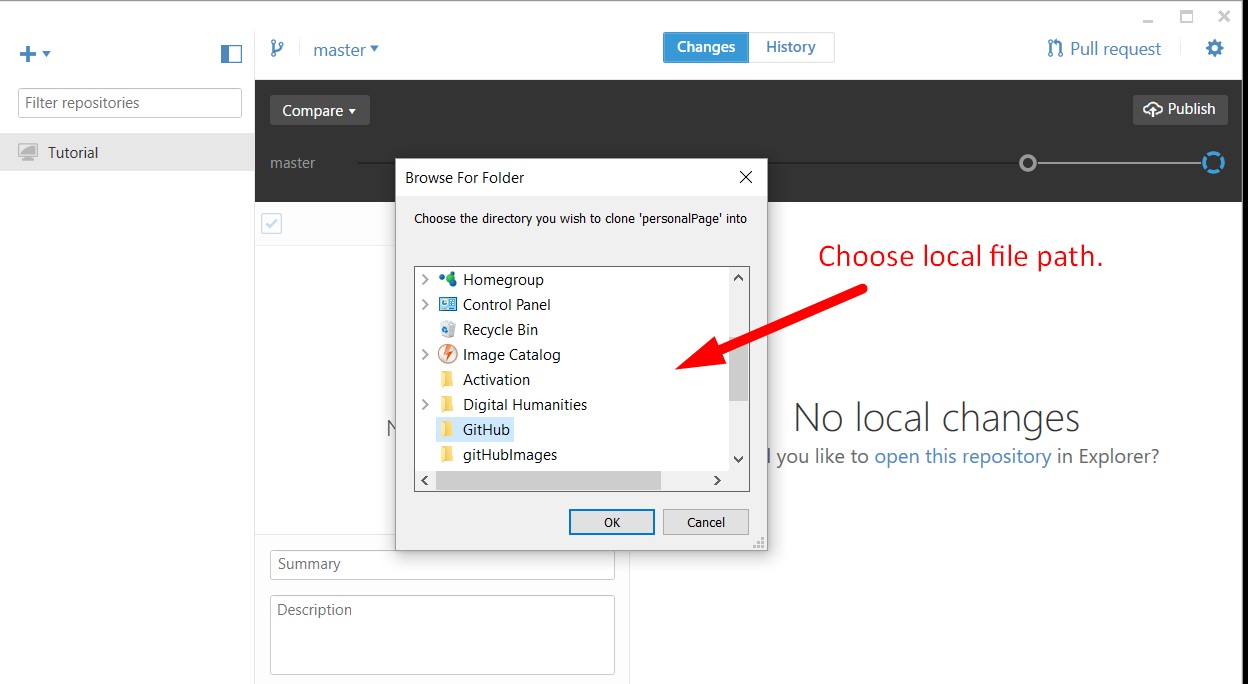
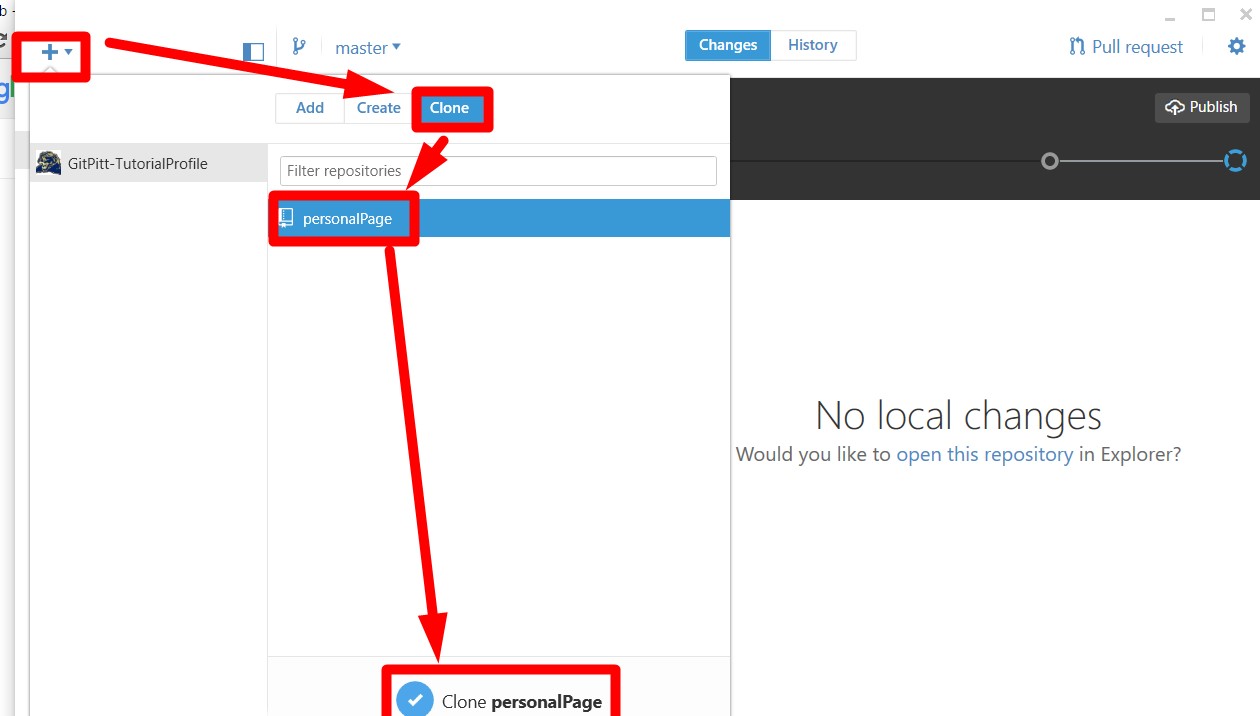
To clone a repository that was created on the GitHub server to the Desktop Client,
open the client and click on the +
sign in the top left corner. From there,
click on the Clone
tab and a list of the repositories associated with your
GitHub account should appear. Select the repo and click Clone
. Refer to the
image below:
Save the cloned repository to your local machine.

When saving the cloned repository to your local machine the default on Windows is usually under a GitHub folder located inside your My Documents folder; on a Mac it is usually directly under your home directory. You do need to be able to find your way to your local cloned copies because that’s where you’ll do your editing, so once you’ve cloned your first repository, open the Windows Explorer or the MacOS Finder and look for the new local repo. If you can’t find it, ask one of the instructors for help.
When you want to change a file, edit your local copy. You can do this by accessing the file on your local machine, like you would any file stored normally on your computer. Make whatever changes you would like. When you are satisfied with the changes and ready to share them with your project partners, open the GitHub client. Navigate to the local repository in which the file exists and open it.
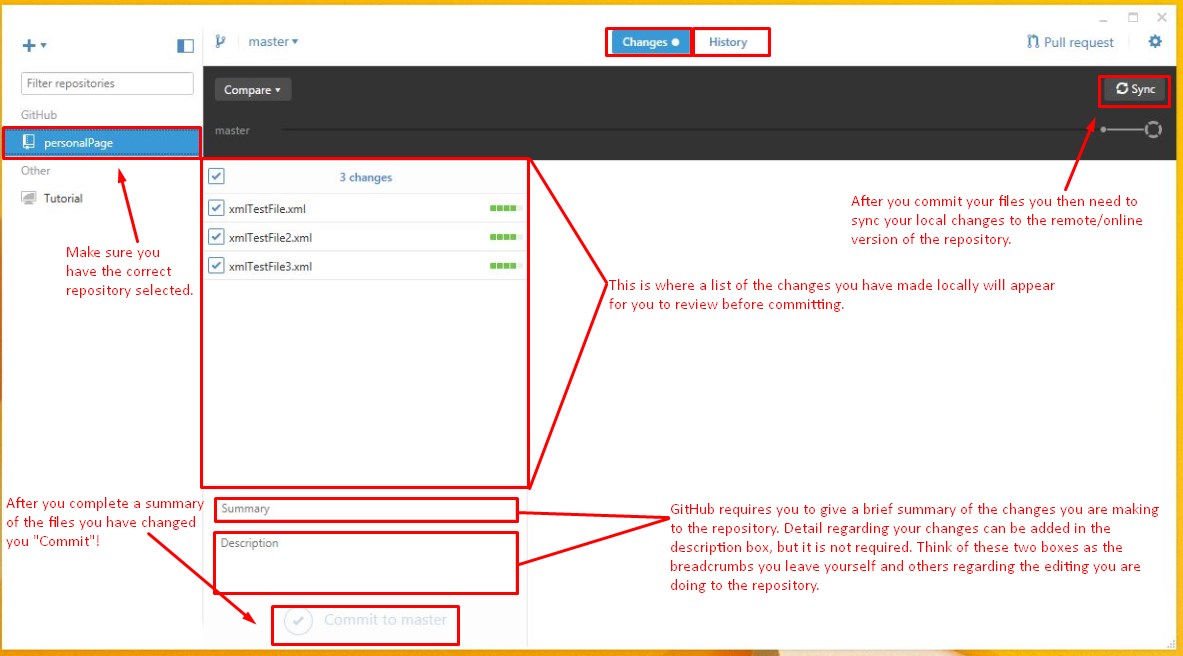
Any files that were edited/added will be listed on the right under the Changes
tab,
and previous commits to the repo are listed under the History
tab found at the top
of the Desktop Client. You must provide information about the uncommitted changes. You
should enter a short summary to remind yourself of what’s being changed (this part is
required), with a more extensive explanation in the description field (optional, but useful
if the short description isn’t fully adequate). Then choose commit to …
(yours will
probably say commit to master
. The changes will be pushed to the GitHub server the
next time you sync the repo., but until that happens, the committing applies only to your
local clone of the repo., and the server doesn’t know that you’ve changed anything. To push
your changes onto the server so that they will be accessible to your project partners, you
must sync the repo (which, in addition to pushing any committed changes
from your local clone to the copy on the server, also pulls down from the server any
changes your project partners may have pushed since the last time you synced). Once you
have committed and synced, the commit will now show up under the History
tab.
Click to sync for the most recent versions of the repository. If you commit and push
something that you later decide was a mistake, you can revert or roll
back the commit. Rolling back the commit undoes the changes and all later.
Reverting the commit reverts the changes made in the specific commit, but it doesn’t affect
other, later changes. The ability to undo an error without having to undo all of the
non-erroneous changes you made afterwards is a powerful feature that distinguishes the Git
way of doing things from the undo
feature in word processors and other applications
with which you may be familiar.
The master branch is the main branch of a project, and because for most of our own projects we do all of our work in the master branch, you may decide to skip this part and not worry about creating additional branches. In complex projects, though, it may be important that the master branch not have errors, and always be in good working order. If everyone is writing new code into the master branch, it’s possible for the master branch to enter an unstable state temporarily. To avoid that, complex projects may require that all developers work on different parts of the project separately, in their own branches, and merge their individual development branches into the master branch only once they are confident that it won’t have a destabilizing effect. This can be useful even in single-developer projects if you need to maintain multiple versions, such as a stable branch that people should be able to download and use and a development branch that will eventually become the new stable branch, but that isn’t yet stable. Branches can be merged and deleted because a branch is an inalienable part of the repo in which it is created in; thus, working in a branch requires you to already have a cloned repo. Just to be clear, when you clone a repo that has existing branches the entire repo gets cloned branches and all.
To create a new branch using the desktop client, select the branches button in the top left
corner to the right of the branch currently selected (labeled master
in the image
below because that’s the branch currently being displayed—and the only one in the project
initially).
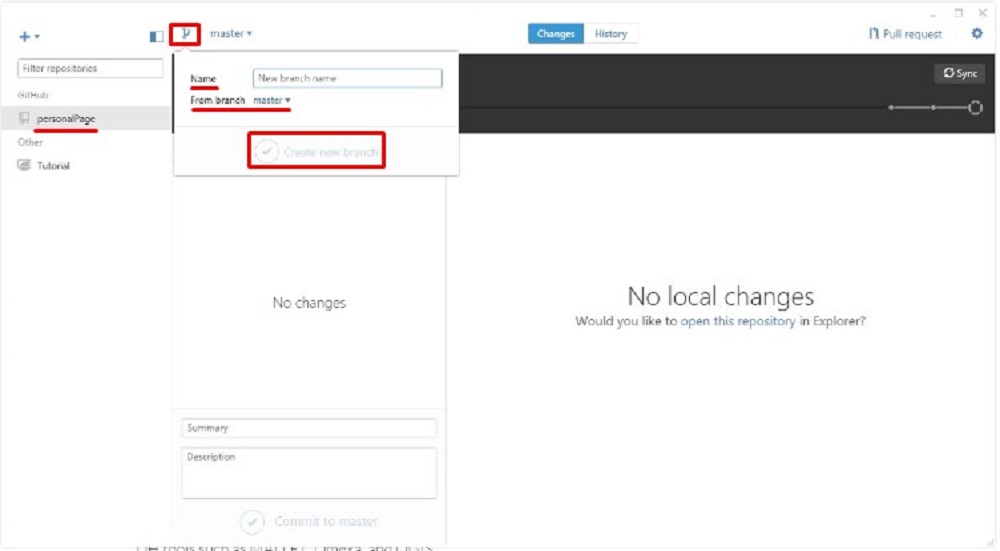
More detailed images on working in branches can be found in the following section where
forking
is discussed.
Part of the open-source etiquette is that developers are encouraged to copy and then improve code originally created by others. GitHub supports the creation of derived projects through forking. When you fork a repo, you create a copy of it under your own account, where it acquires an independent identity. You can do anything with a repo you created by forking someone else’s project that you can with a repo you created from scratch, but from the moment that you create the fork, your new repo is no longer synchronized with changes in the repo from which you copied it originally. If you fork a repo and make changes that you would then like to contribute to the original source, you can issue a pull request, inviting the developers of the original repo to merge your changes into their original project.
forka repo
To fork a repository, first, navigate to the desired repo on the web interface. Then, in
the top right click on the Fork
button.
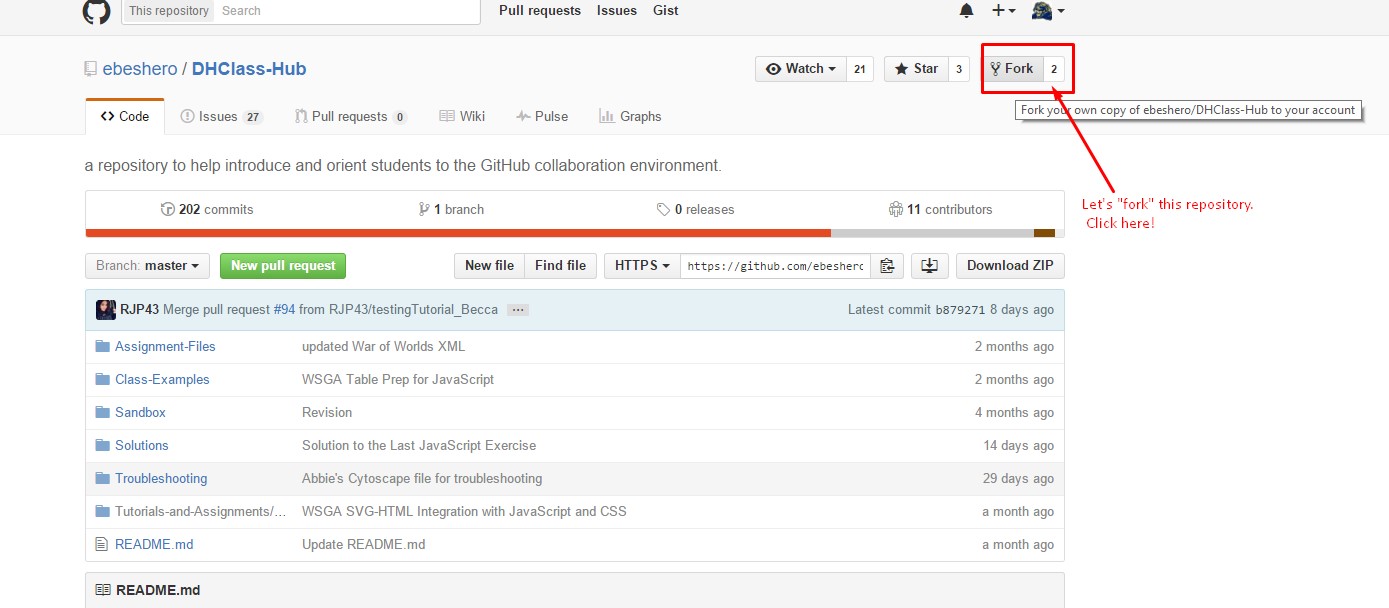
After you click that button, you should get the following screen:
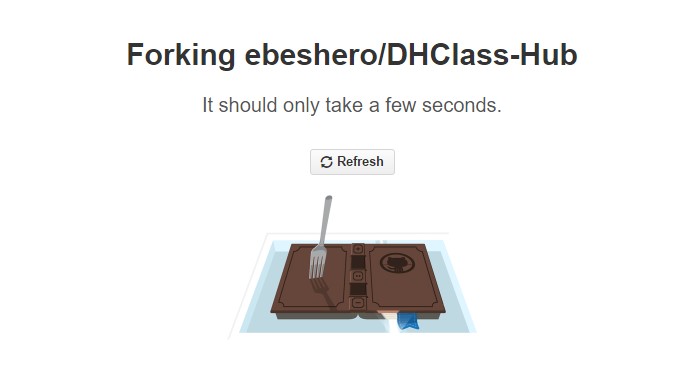
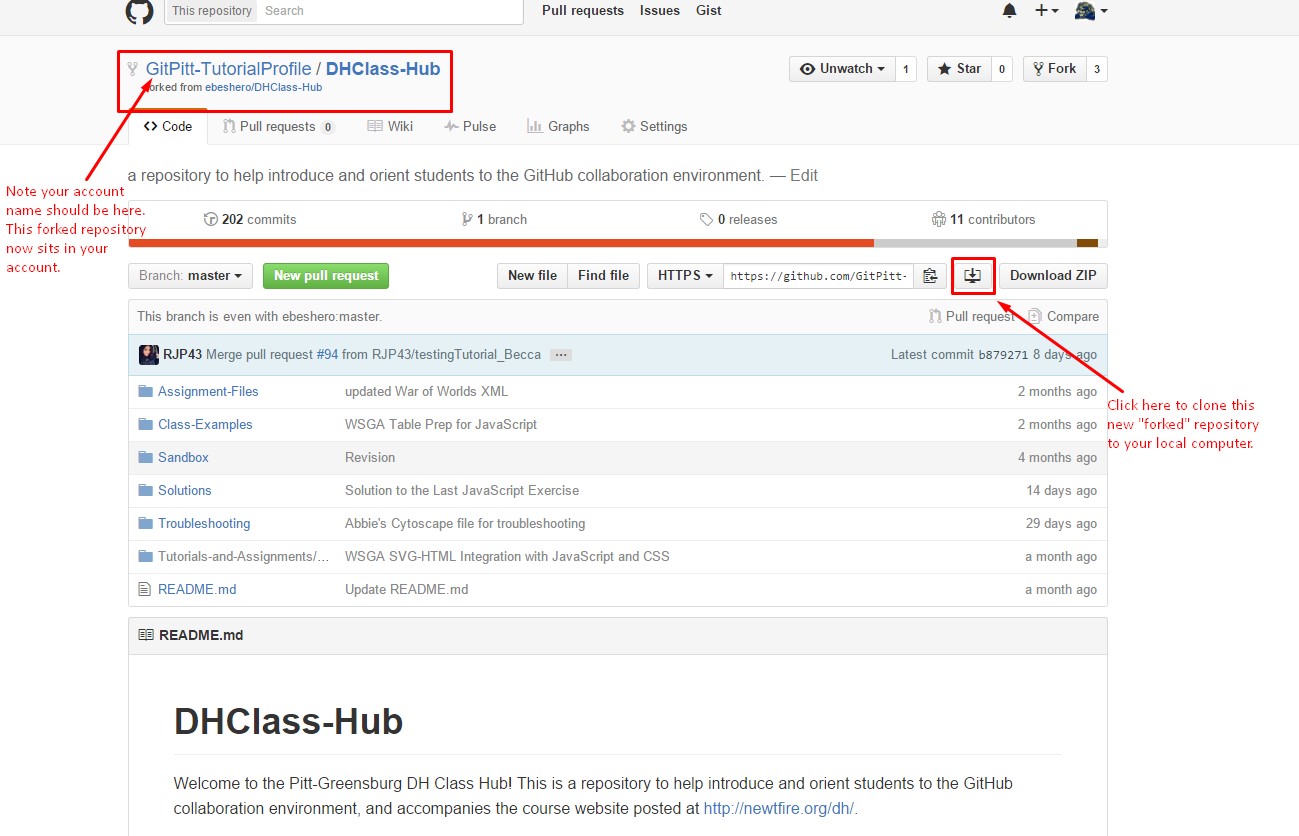
The web browser will now redirect you to your web version of the fork
. From this
screen, you should then Clone
your Fork
to your local machine.
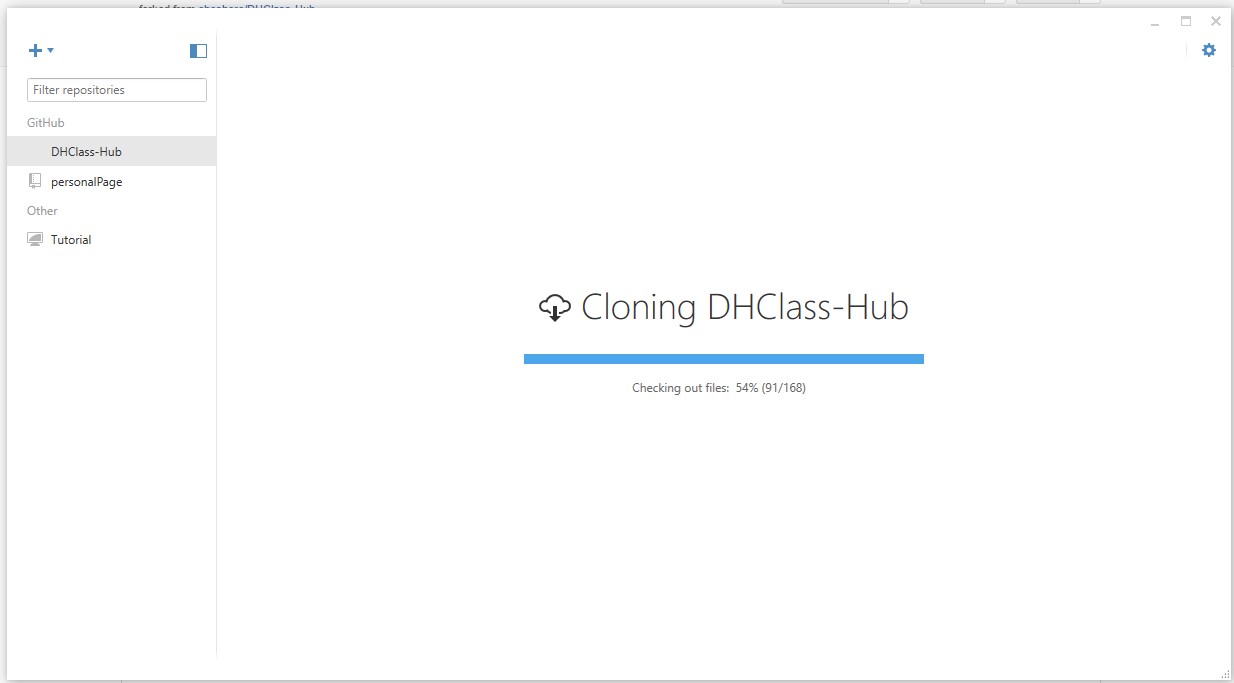
The desktop client will ask you to determine a local file path for your new repo.
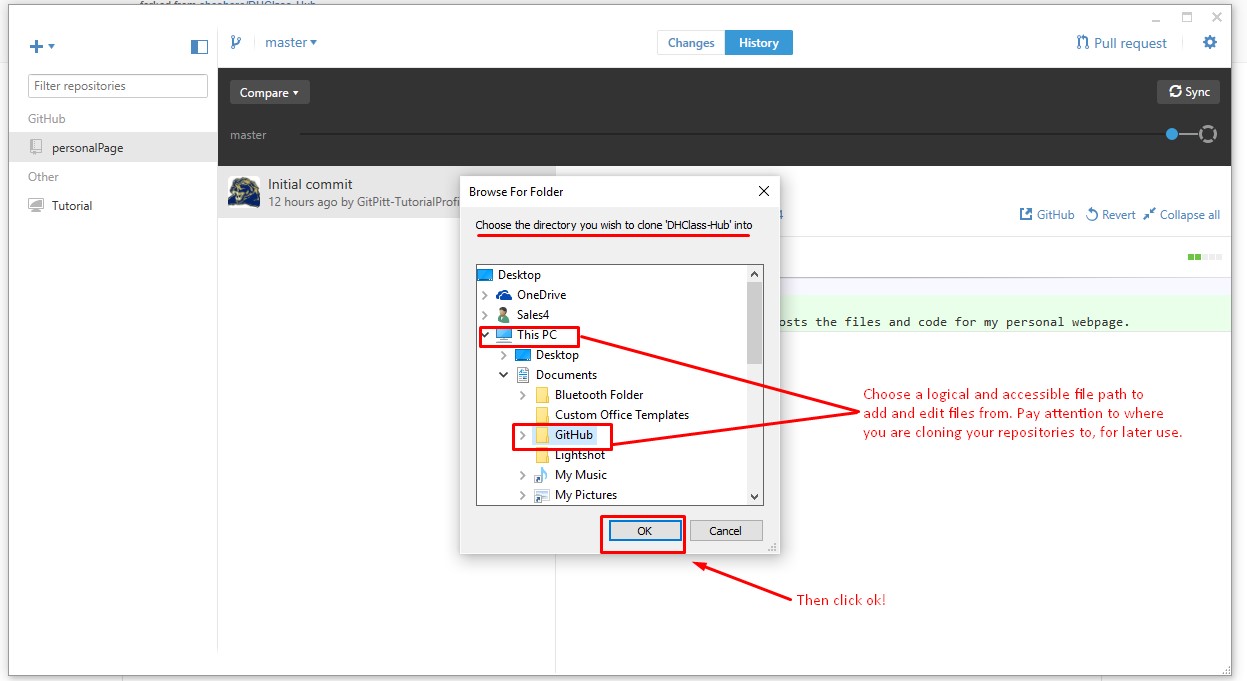
From there, the fork
will be cloned
to your local machine
At this point, before doing any work, you might consider creating a branch.
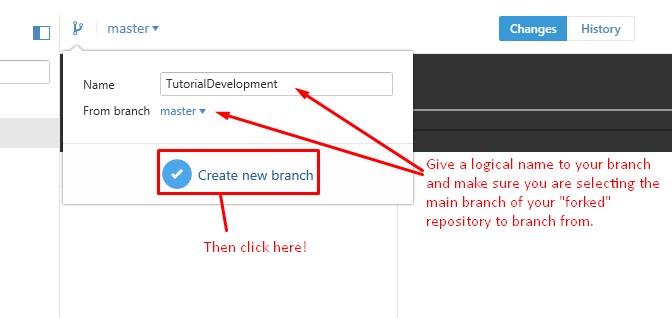
Once you have created the branch you will need to publish
it to the GitHub
server.

Branchof your
Fork:
In order to commit files under the correct branch before committing select the correct branch you wish to commit under. Once you have verified the branch you are committing in, you follow the same committing actions as described above. It is important to note that creating a branch in a fork will be very similar to creating a branch in a regular repo, because a forked repo acts as your own repo from the moment it is forked. See the image below for further explanation on creating a branch.
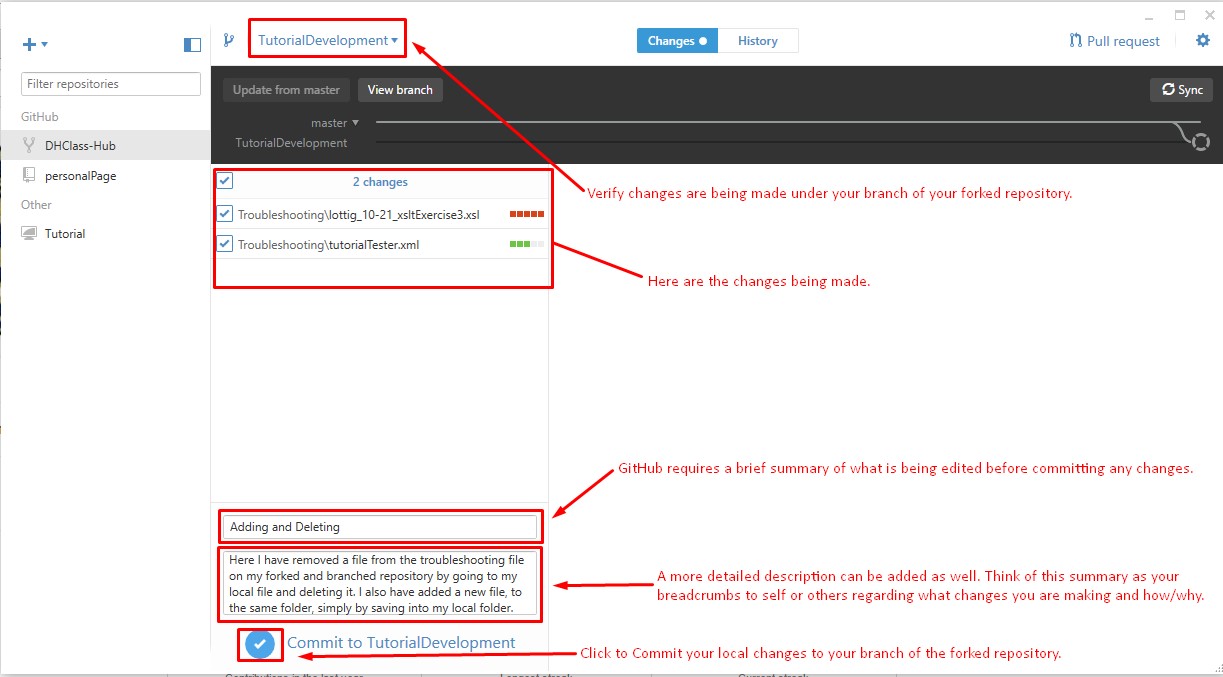
Always remember to sync
!
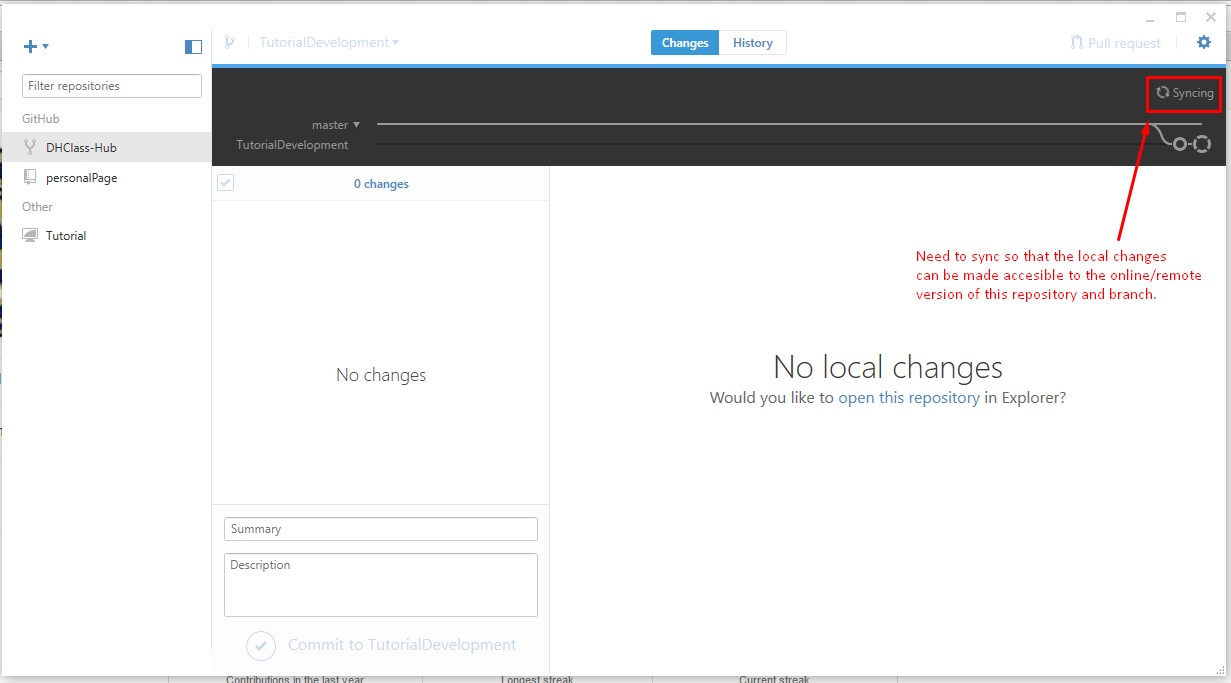
Syncing at this point pushes your branch changes to the fork
. If you wish to
contribute your changes to the original repo you could navigate to the original repos web
interface and do a pull request
or select the pull request
button in the
right corner of the desktop client.
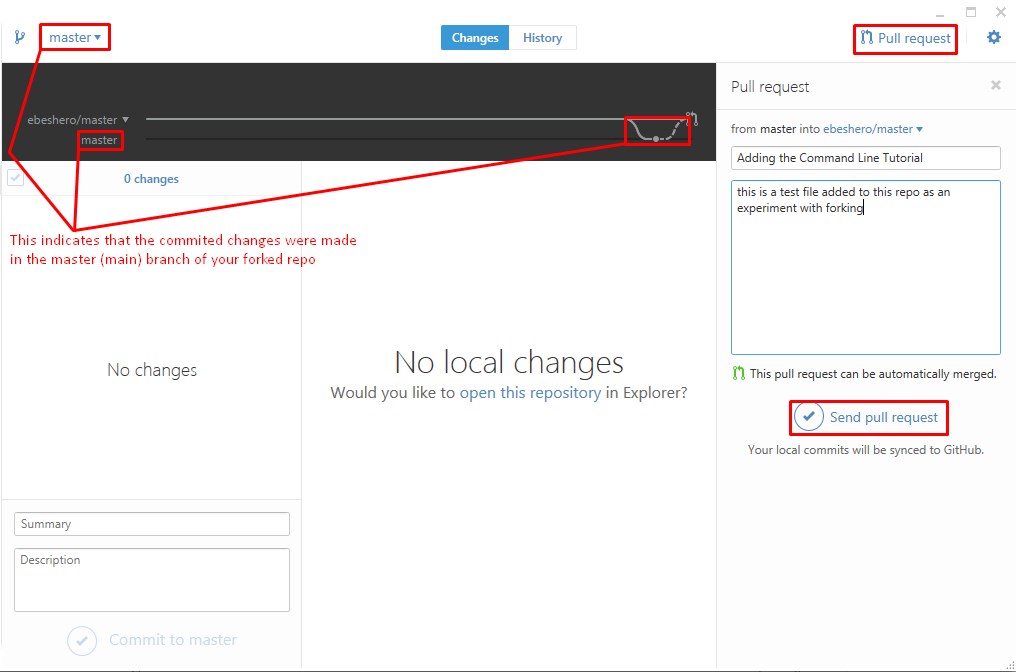
From there, it is up to the contributors of that original repo to pull
your changes
into their repository.
In order to keep your fork up to date with the original repo from the desktop client you will need to declare the original repo (remote origin) as an upstream branch (and this is only possible through Git Shell). The easiest and least confusing way to do this is to follow these few commands in Git Shell:
git remote add upstream [HTTPS link of remote origin]git remote -vgit fetch origin -v git fetch upstream -vgit merge upstream/mastergit pushgit push origin --delete upstream/masterThis series of commands will need to be done every time you wish to bring new commits of
the original repo (remote origin) into your local fork. In a nutshell, these commands
define an upstream
variable for the original repo, fetch
the changes from
there by placing them in a new branch called upstream/master
, merges that new
(temporary) branch into your fork, pushes these newly merged changes to the GitHub server
of your forked repo, and then deletes the upstream/master branch from your fork. There is a
way to do the final few steps, after git fetch upstream -v, in the desktop
client; however, it becomes complicated navigating between the correct branches and syncing
appropriately. Feel free to experiment with the understanding that the desktop client first
four commands, from above, in order to configure the source of the upstream/master
branch.
You should always follow our best practices to avoid being this type of GitHub user:
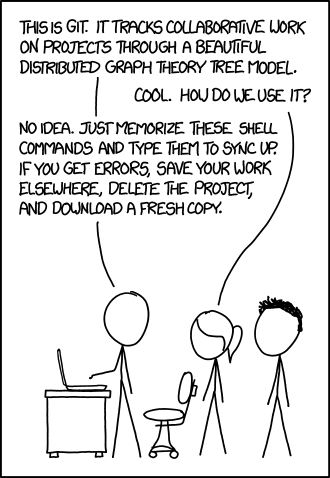
However, if something does go wrong, the strategies for resolving edit conflicts include the following:
when it’s ready.
Git and GitHub can be a bit confusing for new users, but it makes project management much more robust than the available alternatives, it’s what we use in our own work (you can visit our projects on GitHub), and learning to use it is worth the effort. This tutorial is designed to get you started, and your instructors are available to advise and help if you get stuck or confused. There are a number of resources online to further your knowledge, but they all go into more detail than you need just to get started. If you decide to read more, note that there are terminology differences between using the shell and the client. To understand the shell, you can consult the Pro Git book, which is available on line at no cost. There is also a helpful, interactive tutorial on using the Git command-line interface available at http://try.github.io/levels/1/challenges/1.
GitHub is free for use with respect to public repositories, and your course project
resources must be kept in a public repository. Should you wish to use GitHub for other
projects, though, if you are a student and you configured your GitHub account with a .edu
email address, you are allowed to set up five free private repositories (if you registered
initially under a different email address, you can change that in the account settings
online). Go to https://www.github.com/edu, choose the
I’m a student
link, fill out a brief form, and then enjoy your private repos!